With simply paper and creativity anyone can create art


Thursday, April 21, 2011

Spring Romance Sneak Peek

Here is a sneak peek of the Scrap That! DT reveal for the May "Spring Romance" kit. Be sure to come back on April 26th for the full reveal and the monthly blog hop to win some fabulous prizes! May will also mark the one-year anniversary for Scrap That! and we have some amazing surprises in store... so stay tuned!!!


Sunday, April 17, 2011

Pion Design Baby Boy Frame

My cousin is having a baby boy early this summer and this paper from the Pion Design "forget me not" collection was a perfect compliment to the Tattered Angels glimmer chips that I inked with light brown chalk ink. For project photography, I just put a picture of one of my kids. This is actually my newborn daughter in one of her brothers old baby sleepers... must have been a busy week and I ran out of clean PJ's, LOL. I covered a little wooden frame that I bought at Michaels and embellished it - so easy. I hope my cousin likes it!


Design Tip: Don't use Tattered Angels glimmer mist on glimmer chips. I ruined a cute little train I was going to use on this frame (instead of the adventure sign). It turned out flat looking and way too dark. Diffusing chalk ink onto a Q-tip worked like a charm to show the embossing on the chipboard. 

Thanks for stopping by and I will be back on Sunday with another Pion Design project using a new Creative Scrappers sketch.

Tuesday, April 12, 2011

April Prima BAP Challenge

Well, I had these great Prima Life in Colors papers in my stash that I recall buying on clearance for fifty cents each :) I also had some amazing Prima embellies left over from various past Scrap That! kits. Add a Prima sketch and some Dusty Attic chipboard and a layout seemed to instantly appear. I had used a DA clock in my last project and this large one was calling my name, LOL.

I love this picture of my boys from a few years ago, they are about 3 and 5 years old in this one. My youngest loves to wear orange and the oldest still loves blue. These papers are a perfect representation of these kids. They were giggling on the couch when I snapped this picture. I've been scrapping so many pastel layouts lately that it felt good to go to the "dark side".


Here is a close-up of the wonderful Prima flowers I layered... I love those feather flowers! I just used plain old acrylic paint on the chipboard.

And here is the awesome sketch...

Lastly, here is this month's pick and palette challenge which I didn't submit for but maybe some of you want to give that one a go.
Thanks for stopping by!

Monday, April 11, 2011

My First Pion Design Layout

Actually, this is my second Pion Design layout but the other one is not due to reveal on Creative Scrappers until April 23rd. OK, so now that I am retailing Dusty Attic, I have been dying to use the skeleton clock faces (BTW I have a few of these in stock, just e-mail me).

For this layout I used the gorgeous Fairytale of Spring collection. I wanted to scrap this photo of hubby and I on our wedding day with my mom and dad because the green tones of the papers were perfect. A little distressing, a doily, some Dusty Attic chipboard and a few flowers from my stash then voila a fast yet elegant layout. I used the Color Room palette #36 as inspiration for this layout.


On the Dusty Attic chipboard I simply used some chalk ink. Here is a close-up.

Thanks for stopping by and I'll be back on the 23rd with another layout using this gorgeous collection (hint: the soft pink in this collection is to die for!).

Sunday, April 10, 2011

Creative Scrappers Sketch #151 reveal

Time for another Sunday Creative Scrappers DT reveal. I think I scrapped this layout the very same day I received the fabulous sketch created by Nicole Nowosad. I was so excited because I have had in mind to do a layout using my daughter's little shoes for a shadow box... and this sketch was the perfect push to get it done. The papers are a mix of old SEI Mimosa and BG Porcelain from my stash. A special thank you to Tara Orr for spotting me the Zva bling too (so hard to find in Western Canada).

This is my daughter at about 4-5 months old and it is my fave infant picture of her. The flowers are Prima, the butterfly from Michaels and oh the shoes... one of the best baby gifts received.


I couldn't resist using Dusty Attic chipboard (French Window, available in my Etsy shop) and some delicate lacing to compliment the overly girly layout. I used TH crackle paint on the chipboard.


Here is is awesome sketch used for inspiration, you may want to give it a go yourself!

Don't forget to check out what the rest of the Creative Scrappers team did with this great sketch!

I'll be back soon with my first Pion Design layout in a day or two so stay tuned :)

Monday, April 4, 2011

Upgrading

I'm doing a little series for the Ideas For Scrapbookers blog on turning some of your old "newbie" scrapbooking layouts from lacking to lavish. Sometimes the original design concept is good but the layout lacks in dimension, texture and details. I won't be blogging about all the layouts I update for this feature series but this one I changed so much that it even warranted a re-post in my scrapbook.com gallery... so I thought I would post it here too. The original layout was inspired by Gabrielle Pollacco, but now with all the changes I really made it my own. Head over the the Ideas For Scrapbookers blog to see the before on this one and the other layout I updated too. The papers are Prima and the vine I won from a challenge on scrapbook.com from WendyG-SA a few months ago (she purchased the vine on from Etsy.com at http://www.etsy.com/shop/KatiesKreations4U). Thanks Wendy! BTW the wavy distressed edge was created with a Fiskars tearing ruler - so easy and no messy edge distressing tool needed.


If you're curious, the first post in this series can be found here too from last month:

Thanks for stopping by!

Friday, April 1, 2011

Dusty Attic Winner!

Thank you everyone for helping spread the word of my new retail "adventure". Drum roll please...
My Dusty Attic Giveaway Winner:
True Random Number Generator
  9Powered by RANDOM.ORG

Congratulations to...

Nicole said...

Congratulations Vicky!
I am sooo addicted to Dusty Attic chipboard that they might have to put me on A&E Intervention soon! Here is a link to my blog post about your excellent news and generous giveaway http://scrap-utopia.blogspot.com/2011/02/dusty-attic-blog-candy-from-simply.html

What I prefer about Dusty Attic are the chipboard titles! I adore them!

Thursday, March 31, 2011

Scrap That! Hop Winner

Thank you to everyone who participated in the Scrap That! Blog Hop. We hope you enjoyed it and found lots of inspiration along the way. The best part for us was making some new friends!

We have picked one comment winner from each blog to win a package of Prima goodies just for stopping by! The randomly drawn winner for my blog is:
True Random Number Generator  14Powered by RANDOM.ORG

Colleen said...


Your layouts are stunning! So very beautiful! What a precious "honey" among the flowers :)

Please email friends@scrapthat.ca with your mailing address so we can get your Prima package out to you in the mail!

Don't forget to stop by the Scrap That! Blog and see if you won the Grand Prize of a "Madame Butterfly" Kit. We hope the lucky winner enjoys creating with it. We look forward to seeing what you come up with! Join us again when we release our May Kit!

Wednesday, March 30, 2011

Dusty Attic Now Available!

DUSTY ATTIC NOW AVAILABLE IN MY ETSY SHOP!
Let the shopping begin! The product is now available for purchase at http://www.etsy.com/shop/vickyalberto
NOTE: I do have more quantities and as things run out I will post more. Also, I do have oversized items that are not listed such as the skeleton clock faces, nesting brackets and the large chicken wire panel. Due to the size/shipping price these must be part of a custom order (see below) to be cost effective to ship.


Here is a sneak peek of a layout I submitted to Pion Design for their DT Call. The layout will reveal in April for Creative Scrappers and here on my blog of course. Notice the yummy Dusty Attic, LOL?

New Pion Design Release

The new Pion Design Collection Minnenas Ateljé (Studio of Memories) has been released. I can't wait for this to arrive in the mail to me soon. The vintage colors combined with elegant birds and butterflies will surely make for heavenly project results.


Monday, March 28, 2011

Frosted Pion Flower

I created a new handmade flower to complement the romantic Pion Design style papers I am working with. What I like about these is that you don't necessarily need to own a paper punch or die cutting machine to create them and they do not get damaged in a scrapbook.


Supplies you will need:
- Three same sized 3-petal flower shapes. I used the Marvy Uchida "Pansy" punch (2-inch)... but see next step if you do not have a punch or die cut like this.
- Water to mist
- Paint: Snow Writer (DecoArt brand), dimensional paint (like Liquid Pearls) or fabric puff paint. A heat gun is required if using fabric paint to make puffy. I used Snow Writer on mine because I love the thick texture (and it is acid-free).
- A decorative centre (mini rose, button, large brad etc.)
- A rounded tip object like a marker or thick pen
- A foam mat (like a computer mouse pad)
- Some liquid glue of choice


If you do not have a 3-petal flower punch or want a different flower size, then use a circle and draw the shape and cut it. As shown below, it is very easy to get a similar shape to my pink punched flower. The pink Tulip Bud paper from Pion Design's Fairytale of Spring collection is featured in this tutorial.

Step 1: Mist your 3 flowers with water and pleat fold your petals (like an accordion).

Step 2: With your rounded pen, press into the middle into a foam mat to form a cup shape. Let completely dry. 

Step 3: Once dry, pull the petals open and frost the edges with your paint and let dry.

Step 4: Glue your 3 layers together and while the glue is still wet press entire flower into the foam mat to raise the petals. Let glue completely dry.

Step 5: Add a decorative center. You can also add ink to the painted edges for rustic layouts. I did not for this tutorial.

Five easy steps and you're done! BTW - the custom blue resin button was made by my friend Ivana Camdzic.

Thanks for stopping by. As always, I am more than happy to share how I make my flowers but should you make them yourself and post online, please give credit where due (as these tutorials do take a fair bit of time to produce). TFL!

Sunday, March 27, 2011

Creative Scrappers Sketch #149 Reveal

(Scrap That! Blog Hop - scroll to next post)

It's Sunday, DT reveal day for Creative Scrappers! I haven't done a "clean" (non-shabby) layout in a while so I thought I'd switch it up a bit. I used the very last scraps from my January Scrap That! kit since the colors were perfect for my son's very fist school photo (pre-school, LOL).

The papers are MME Lost and Found - Union Square (love these!). Aphra Bolyer's sketch was so easy to work with but my bling was not. I tried some dollar store bling - pretty but VERY difficult to work with (you get what you pay for!). The butterfly was also from my wonderful dollar store. I made the wheel "flowers" with scraps too - great embellie for guy lo's.


Notice the Dusty Attic fence? It's listed in my Etsy (http://www.etsy.com/shop/vickyalberto) along with the rest of my shipment from Australia. I just used some chalk ink on it - love the texture it gives my page.


Here is the wonderful CS sketch #149 this week.

Don't forget to head over to Creative Scrappers (http://creativescrappers.blogspot.com) to check out what the rest of the team created this week too!

Friday, March 25, 2011

Scrap That! Reveal & Blog Hop

March Blog Hop Adventure!
If you have just arrived here from TINA’s blog (our GDT this month), you are in the correct place!  If not, head back to the Scrap That! blog and join us.

We're revealing a day early to coincide with the release of the PageMaps sketch included in this kit. Let's get the reveal started and the blog hop info is at the bottom of this post. The March "Madame Butterfly" features the GORGEOUS Bo Bunny Gabrielle collection and some of the most beautiful blooms I've ever worked with.

My first layout "among the flowers", is my son as a toddler. I added the little blue flowers and leaves from my stash to compliment the kit flowers here (Prima) and papers. I just love all the butterflies you can cut out in this collection. The teal went perfectly with my son's eyes too!


Design tip: Layer your flowers for a gorgeous big flower focus.

My second layout "eternal" is of my wedding day. I added white and clear accents (flowers, doily and bling) to compliment the over the top gorgeous blooms in this month's embellie add-on kit (mix of Petaloo and Prima on here).


Design tip: Use small flowers instead of leaves to cluster around lager flowers on layouts when greenery doesn't work with the color scheme.

For my third layout "butterfly kiss", I used a picture that is over 40 years old of my mother-in-law with hubby's older brothers. The picture is dark and poor quality but it's the best I could correct it. I think it works well with the colors in this collection and the shabby feel to the papers though. I used some doilies and small flowers from my stash to polish this one off. Is it wrong to scraplift yourself? I did a pre-made page for a friend with a very similar design using the December kit, LOL.


Design tip: Layer your doilies to add a lot of texture to your pages and overlap with fussy cutting to break-up the round shape.

My last layout for this reveal, "butterfly lullaby" features my handmade Fuzzy Lollipop Flowers made from mulberry paper that is INCLUDED in this kit. This kit features Dusty Attic dress forms but my picture wasn't girly so I opted to put my own DA piece on here which is a scroll frame that I cut in half and topped with crackle paint and chalk ink. Looks way better in real light. I also used the March Dusty Attic sketch for this layout.


Design tip: Use my Fuzzy Lollipop Flower tutorial to make your own! These were the actual flowers made for the tutorial... no use in wasting them, right?

Here is a picture of the main kit (without the embellie add-on)... as you can tell I still have a lot of leftovers from this kit. Haven't touched the chipboard, trim and some of the papers yet. There is so much value in these kits and with the embellie add-on... I ALWAYS manage to get 5 layouts done with each kit (eventually, LOL). FYI - the mulberry paper is not pictured here because it is a late addition (after this photo was taken).

Now for the hop information...

Before you hop along to the final blog - PageMaps - you will want my secret word, which is ANNIVERSARY.  Now head over to PageMaps for your final stop.

MAKE SURE YOU...

1) VISIT ALL NINE BLOGS ON THE HOP, LEAVE A COMMENT AND BECOME A FOLLOWER OF EACH

2) GO TO SCRAP THAT! FACEBOOK PAGE AND BECOME A FRIEND

3) GO TO THE SCRAP THAT! SOCIAL COMMUNITY AND BECOME A MEMBER

EMAIL THE SECRET SENTENCE TO friends@scrapthat.ca to qualify for the grand prize - an autographed PageMaps hardcover book generously donated by Beck Fleck! 

We hope you all had good fun hopping with us today, thank you so much for playing along. Good luck to all participants! The hop ends at midnight on March 27th (MST).


(International hoppers outside of Canada and USA must pay shipping on any prizes won)
Here is the blog sequence you should have done:

1) Scrap That!
2) Ivana
3) Janis
4) Karen
5) Lisa
6) Tara
7) Tina
8) Vicky (ME!)
9) PageMaps

DON'T FORGET... TO ENTER MY DUSTY ATTIC CHIPBOARD GIVEAWAY! View the prize image at the top of this blog in the right sidebar. I will be drawing on April 1st.

Thursday, March 24, 2011

Scrap That! Blog hop TOMORROW!

Join us for the Scrap That! “March” Blog Hop TOMORROW!!! We will have NINE AMAZING blogs for you to visit.

We are also thrilled to have PageMaps joining in on our hop with an awesome sketch that has been especially designed for Scrap That! to go with the kit! 


You will need to visit ALL the blogs on the hop :) There will be a randomly drawn comment winner from each blog = 9 PRIMA prizes to be won.

Next, while you are hopping you will want to be looking for the “special” word on each blog.  Once you have visited all the blogs and collected all the special words, they will create a sentence.

Once you’ve done that, you’ll need to swing by our facebook page, and become a friend, and then head over to our social community and become a member.  Once you’ve completed these tasks, email the sentence to friends@scrapthat.ca.

All correct entries received will be entered into a draw for the GRAND PRIZE, an autographed PageMaps hardcover book generously donated by Beck Fleck! 

Don't forget you must become a follower of all the blogs you visit, a Scrap That! facebook friend, and a Scrap That! community member in order to qualify.
The hop will take place from 10 am March 25th until midnight March 27th (MST)

(International hoppers outside of Canada and USA must pay shipping on any prizes won)

Pion Design - New Collection Teaser

I have had the privilege to view images of all the individual papers for the new collection releasing later this Spring. Let me tell you it is so gorgeous it will blow you away. It's in my top 3 favorite collections of ALL manufacturers so far in 2011. For the North American girls out there, if there is enough interest in Pion papers, I will be making them available to you via my Etsy shop once the new collection is shipping. Drop me a line if you're interested (comment at the bottom of this post). Here is a small teaser of the collection - birds, butterflies, flowers OH MY! I received my box of the other (already released) collections and will be working on something special to post next week so stay tuned.


Tuesday, March 22, 2011

April Scrap That! Sneaks

The next Scrap That! reveal will be a day early on MARCH 25th and will include our new monthly blog hop. Don't miss-out on all the fabulous prizes to be won! Check out the gorgeous DT sneaks...


Sunday, March 20, 2011

Entire 2011 Pion DT Announced

Oh my goodness this is a "not too shabby" (LOL) Pion Design team! I have been a fan of all of these artists and now get to design for the best Swedish manufacturer along with them too... pinch me, pinch me - this can't be true. I have put a link to everyone's blogs in the right sidebar here on my blog - check out their work! This is going to be a spectacular shabbylicious year :)


Saturday, March 19, 2011

Pion Design DT - OMGosh!!!

Have you heard of them? Pion Design in Sweden manufactures THE best soft, romantic papers you've EVER seen. Before their DT Call closed, Jenny Erickson contacted me to guest design (check out the announcement here that was posted last week) and my box of goodies is due to arrive ANY day now. But then I woke up this morning to an e-mail requesting a DT term of a YEAR as their Canadian representative. I couldn't say yes fast enough. I am soooooo thrilled. Check-out the glorious collections and stunning vintage photo cut-outs below. I'll post the entire international DT list once it is released but if you want to check out some fabulous work visit the Pion blog, or my friend and GDT girl Toni Kelly's blog (aka 2Dogs on Sb.com) for amazing inspiration. I can't wait for my box to arrive and dig-in!


Tuesday, March 15, 2011

Fuzzy Lollipop Flower Tutorial

I just love the new Prima Innocence 2 flowers and was inspired to make my own using some inexpensive thin mulberry paper (can be found at most local artist materials supply shops - where university art students buy from have the best prices though). You can use thicker paper like people use for making tear bears but then the cost is a lot more and probably worth just buying the Prima ones, LOL.


Supplies you will need:
- a sheet of mulberry paper (a 12x12 sheet will yield 3 good sized flowers of 2-3 inches each)
- a very firm bristled toothbrush (if you don't have a wire brush used for tear bears)
- a Q-tip type cotton swab
- a decorative brad
- a little pot of water
- pearl strand (optional, not shown)


Step 1: Using the Q-tip, freehand "draw"one water circle at a time and then with dry fingers gently pull out the circles. For a 2-3 inch flower you will need 7 circles (anything bigger use 9 circles). You will want to progressively get smaller with your circles. 


Step 2: Stack the flower larger to smaller circle and secure with your brad.


Step 3: Brush the layers all around, stroking from middle to outer edge to make the paper fuzz a little more.

Step 4: One layer at a time, starting with the smallest, crumple them up toward the center as shown below. Be careful not to pat down the fuzzy edges though.


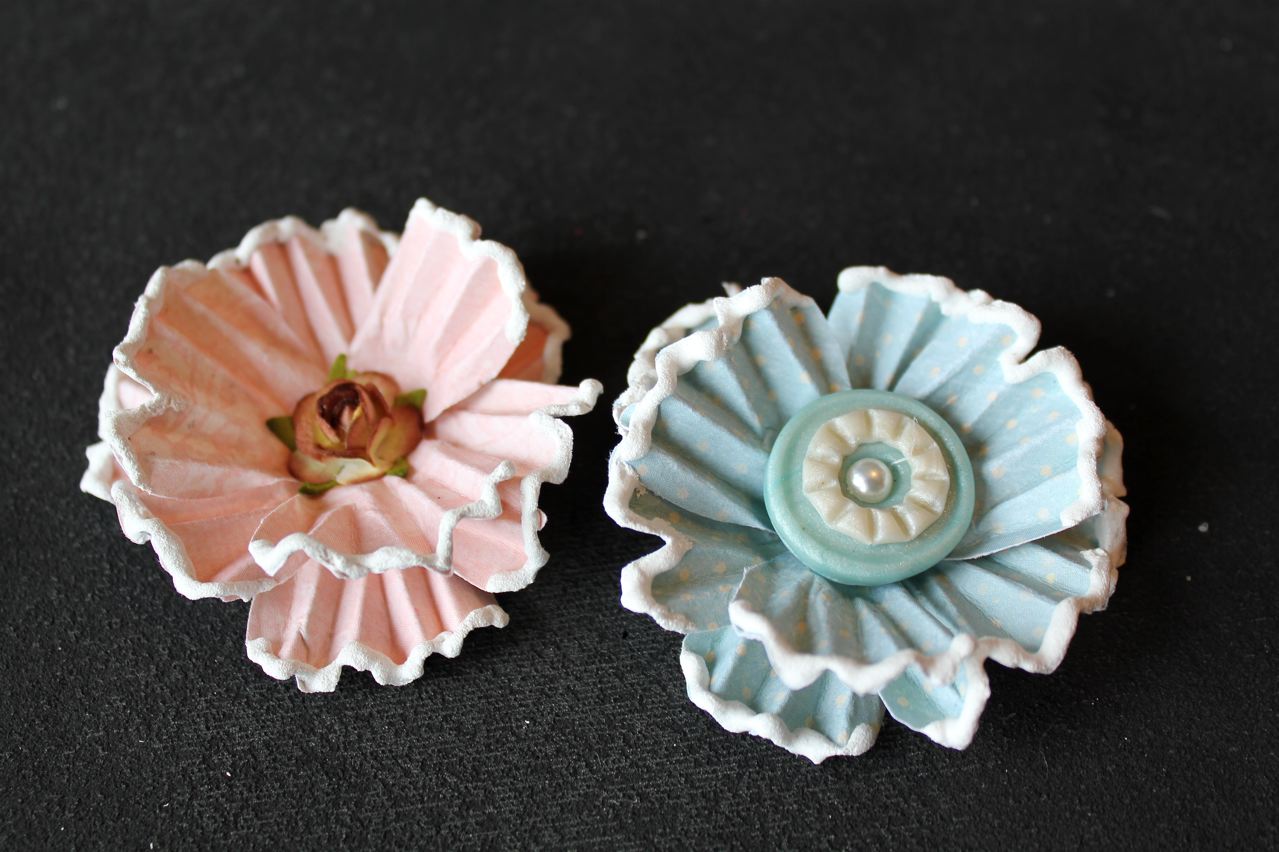
Step 5: Carefully open up the layers starting with the largest circle. This circle flower is about 2 inches in diameter.


Step 5: You can further decorate your flower by adding a ring of string pearls around your decorative brad but be careful not to put too much glue as it will stain the thin paper. The larger flower below is over 4 inches in diameter and I used 9 circle layers for that one.


Here are the original Prima flowers I used as inspiration. I suspect they are made of thick mulberry but I have not seen these yet in person. Just fell in love with this picture and had to try making something similar for an upcoming layout.


Thanks for stopping by. As always, I am more than happy to share how I make my flowers but should you make them yourself and post online, please give credit where due (as these tutorials do take a fair bit of time to produce). TFL!