With simply paper and creativity anyone can create art


Friday, March 23, 2012

Easter Treat Boxes (Pion Design/Green Tara)

Can you believe that Easter is just in 2 weeks? OMG I can't start to tell you how April will be so busy for me.  I have 3 kids, ALL with birthdays in April - PLUS Easter too!  If that is not enough, there are also 2 weeks of no school - since I do before and after school care for 3 children other than my own = I get nothing done for the first 2 weeks of April!  THEN, my Dusty Attic shipment is due to arrive soon and there is STILL... income taxes due for my childcare and retail businesses (of course I have procrastinated in order to scrap instead :)  Oh yeah - scrap work for 4 DT's now too!  AHHH!!! It makes Christmas seem like a breeze, LOL.  So please forgive me if I am not around much to visit blogs and galleries next month.  Anyways...

I have made 3 cute little kirigami boxes from my tutorial using beautiful Pion Design papers (a mix of "Studio of Memories" and " Fairytale of Spring" collections) and gorgeous Green Tara Aster flowers and many of their trims. The two paper collections work so very nicely together!


I used the pretty TCR palette #103 that is based on Pion's Fairytale of Spring collection since Pion Design is a sponsor for TCR for March.

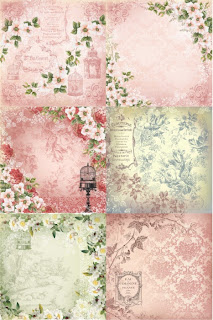
Also, Pion's Fairytale of Spring collection is now available in 6x6 (shown below) - recently released after the overwhelming success of the 12x12 size.


Green Tara Products used:
6.5cm Aster Batik Vintage
CODE: FDS029BatV
6.5cm Aster Batik Sunset
CODE: FDS029BatSS
Lace, 1cm Off White
CODE: L3077OW
Bud n Bow 16mm, Pink
CODE: RB6761P
Loop n Tassel 10mm Pink Champagne
CODE: RB9694PC

Friday, March 16, 2012

Guest Designer for TCR!

As a Pion Design DT member, this week it's my turn to be a featured artist at The Color Room (for the sponsorship month). TCR palette #102 I used is based on Pion Design's "For Father" collection so it was fitting to use these beautiful masculine papers for my design.

The picture if of my husband, taken 8 years ago when he was 30 years old. He doesn't look too much different now (other than a little thinner hair). I used some Dusty Attic chipboard pieces from my Etsy Shop (chicken wire and wrought iron trim) to enhance the rustic feel. I still can't do a manly layout without flowers (and even put butterflies on this one too, LOL). BTW - NEW Dusty Attic Chipboard arriving in APRIL to my shop - the brand new releases and also a re-stock of most popular items in demand!

Here is a close-up the Prima flowers and Dusty Attic chipboard (I simply distress inked it).
This is the gorgeous inspiration palette:

 This the the complete For Father collection:

I actually used a sketch by Heather Landry (my Ideas For Scrapbookers team mate) but the sketch isn't due to reveal until next week over on the IFS blog with more interpretations of her fantastic sketch to be seen.

BTW - A big "SQUEEEL"!!! My new Pion Design papers arrived today - see next post :)


Thursday, March 15, 2012

New Pion Design Collection!!!

They've done it AGAIN! Pion Design just released a "For Mother" collection. Just me style, soft pastels for Spring - and they are already in the mail on their way to me (whooo-hooooo!!!). Here is what Pion has to say about this new collection...

There are many special moments and occasions that are significant to us; our family, a new home, a birthday party or just those everyday events that makes our lives unique. For the arrival of Spring and to honor all the precious mothers around the world, Pion Design proudly presents our new collection - For Mother. A collection suitable for sharing those special memories and creating treasured family keepsakes. For Mother contains 15 double sided patterned papers in 12x12 size. It is a soft and warm color palette with a feminine touch. We also have 24 designs in 6x6 size. The coordinated patterns consisting of delicate flowers, dresses, cakes and doilies, will appeal to mothers, daughters and all of those we wish to show our appreciation for. For Mother is a timeless design that will offer you the possibility to create countless pages and projects in order to capture moments and preserve memories for future generations.Our new collection is now in stock and is ready for immediate shipping. Hopefully For Mother will give you much joyful and creative inspiration!


Tuesday, March 13, 2012

Swirlydoos March Kit Reveal Blog Hop

Welcome to the Swirlydoos March Kit Reveal Blog Hop Block Party! This kit, named "French Quarter", features the gorgeous Glitz Design "French Kiss"collection combined with a wealth of incredible flowers, embellishments and specialty papers.

If you came here from Angelica's blog, then you are on the right track. If not, go back to Swirlydoos' blog and start from there. We have some amazing projects for you to see today and as a bonus we have 2 manufacturer blogs that are joining in the fun and a 3rd manufacturer offering a prize! There are 4 prize packs up for grabs so make sure to follow along and have fun!

My first layout, "No. 1" is of my first born. I used the gorgeous March kit sketch and tried something different - no doilies or distressing! The black mat is actually a piece of black velvet from the kit. I added some Dusty Attic clock chipboard from my stash. The large Prima flower is in the main kit, the smaller ones are in the add-on.


Here is a close-up of the gorgeous flowers and the finish on my chipboard (black ink and dry brushed copper acrylic paint on top).
Here is the AMAZING kit sketch - my favorite one from all that I've seen from Swirlydoos to date!

For my second layout, "C'est tres Magnifique", this is my daughter wearing daddy's hat. I used the Swirlyhues challenge as my inspiration. Again, added a Dusty Attic piece from my stash and the greenery vine was left over from my February kit (cut it in half to use on here).
Here is a close up of the beautiful Petaloo flowers from the add-on kit.
Here is the Swirlyhues sketch and color palette.

For my last layout, "tender", this is me 7 months pregnant with my daughter and the boys are "waiting for something good to happen" (as in the text printed on this paper). I used the Dusty Attic sketch and a DA piece from my stash (brown ink and dry brushed with bronze acrylic paint on top) and finished it all off by cutting up the Prima vine to surround it. Kinda reminds me of a momma bird in a nest with her babies, LOL.

I fussy cut one of the Glitz cardstock pieces in the main kit.

Here is the beautiful Dusty Attic sketch I used as inspiration.

BLOG HOP DETAILS:
You have until midnight, eastern time, on March 15th to complete the hop. Winners will be announced on the Swirlydoos Blog on March 16th. In order to qualify to win here is what you need to do:

1: Visit ALL of the blogs and leave a comment on each. This way we know you were there. Become a FOLLOWER if you're not already. Take your time. There are beautiful things to see along the way.

2: Before you leave each blog, look for the “special” WORD and write it down. 
Once you have visited all the blogs and collected all the special words, they will create a sentence. 

3: Finally, go back to the Swirlydoos blog and leave a comment letting us know how much fun you had and tell us the SENTENCE that was created with all of the special words you collected.

My special word is : THOSE

The party continues over at Tiffany's blog. Have fun! I will be back before the end of the month with a few more projects  - so many more goodies still to use from this awesome kit!

Sunday, March 11, 2012

New Meg's Garden Collection

Happy Sunday! Ohhhh... just look at what is coming soon to my mailbox from Meg's Garden! To see the entire "Forget Me Not" collection, click HERE to go to their website. This is just a little sample...

Friday, March 9, 2012

New from Green Tara (and DT announcement)

Soooo much exciting Green Tara news!  First off, they have asked me to stay on their design team for another term! Of course I was going to say yes anyways and then they asked me to check out the new product they JUST launched. FABRIC flowers and butterflies!!! OMG - steal my heart! How could anyone NOT want to design with these? They come in all sorts of colors - these are just a few samples below (I can't wait to get my next DT package :) Oh... and if you aren't already following their blog yet... you really should (the ladies on that DT are so creative!). Well TGIF... and now I leave you with this to drool over...


Tuesday, March 6, 2012

Pion Design and TCR!

Pion Design is sponsoring The Color Room for March and palette #100 is based on Pion's "From my Heart 2 collection". This is picture of my daughter last summer at the lake by my house.


The chipboard butterfly is from an old K and Co. collection and the brown bling is ZVA.

I used a variety of flowers from my stash and pink ZVA bling to frame the picture. I punched the picture with a MS punch and sanded the lace edge to make it white.

Here is the gorgeous TCR palette #100. I love it!

I am often asked where the inspiration for my layouts come from - the answer is EVERYWHERE! This one was from a piece of MME paper I've used on a previous project.

Thanks for stopping my and I hope you can join in the fun at TCR this month!


Wednesday, February 29, 2012

Giveaway WINNER - Carol

Let me just say that I am overwhelmed at the thoughtful words everyone always leaves for me on this blog and thanks again for all the sweet comments for my giveaway post. The winner of this prize is... lucky #10 - Carol!


CONGRATS!!!
Please e-mail me your mailing address (and full name :) to vickya@shaw.ca


Sunday, February 26, 2012

Meg's Garden DT!

I came across an Australian company, Meg's Garden, through a friend of mine Eila Sandberg (and they were recently the sponsor for The Color Room too). I was pleasantly surprised last night to hear that I had made their Design Team... now for the kicker - check out the rest of the new DT members that were announced today (joining an already awesome team). I am beyond excited to be designing with them - congrats to these talented ladies!

Eila Sandberg from Sweden
http://dollopsofscrap.blogspot.com.au

Heather Jacob from Australia
http://nsnlso.blogspot.com

Gabrielle Pollacco from Canada
http://gabriellepollacco.blogspot.com

Cathy Cafun from Australia

Here is just a little sample of a few of their paper collections:


Returning DT members:
Adriana Bolton (Australia)
Denise Ann Boddey (Australia)
Gayle Price (Australia)
Sandie Edwards (Australia)

Be sure to check out Meg's Garden Blog to follow the upcoming DT work!

Wednesday, February 22, 2012

Parisian Card (Guest design for OUAS)

The Swirlydoos Design Team is guest designing for the Once Upon A Sketch challenge site this month. The sponsored prize is a KIT!

I created a card with Nadia's beautiful sketch. Because, I was given the sketch before my first Swirlydoos kit arrived, I simply used some gorgeous Pion Design vintage image and papers (From my Heart 2 6x6 size) and Green Tara embellies. The challenge theme is Holiday/Vacation. This card was actually my Valentine's card to my hubby - the papers remind me of our trip to Paris (before having kids :) and the journaling inside is a famous quote from the movie Casablanca "We'll always have Paris".

Tuesday, February 21, 2012

More Swirlydoos Feb Kit Projects

I just can't believe how much product the Swirlydoos main kit (Feb - Mon Doux) and flower add-on provides. Here is my FIFTH layout with this kit plus a card too! Granted, now I am down to one sheet of paper and a few flowers left, LOL. But... wow 6 projects in total is GREAT value!

OK, so on to my layout... these are my boys when they were babies. Admit it... we all get those Wal-Mart photos at least once when we have a baby and don't know what to do with them. Well, I decided to make the best of it because they both did look so cute! I cut up the Kaiser die cut to use as a background and cut out the square frame from it too. This kit had beautiful little white flowers and blue crystal gems so I made some large flowers to compliment.


Here is a close-up of my handmade flowers. See my Soft Petal Flower Tutorial to make your own!

Lastly a sweet little flap card. The floral print was just too pretty to pass-up making something with that half sheet of paper. And that gorgeous lace/pearl trim was a perfect fit. For another flap card idea, see my purse card instructions.

Thanks for stopping by today!

Monday, February 20, 2012

Darling layout (Pion Design/Green Tara)

Happy Family Day! (for Canadian folks like me :)

With the long weekend... I had a little time to play and was so inspired by TCR palette #98. I rarely scrap with purple but I loved the combo with the sage green and navy.

This is my daughter at 2 years old - just being her cute little darling self. I used a mix of Pion Design papers from the Studio of Memories and For Father collections then added a garden of purple and lavender Green Tara flowers (gardenias, apple blossoms, roses and cherry blossoms). The crochet doily was bought last year at Michael's and I polished it off with a Dusty Attic chipboard piece.


Here is a close-up of the flowers and navy ZVA bling:

I painted the chipboard with white crackle paint and used chalk ink to add the color.

Here is the gorgeous palette for this week:

I'll be back tomorrow with a few Swirlydoos projects!


Saturday, February 18, 2012

Peony Flower Tutorial

Here is a fun and easy flower tutorial to make a peony flower. No difficult techniques or fancy tools/products required!


What you'll need to create this flower is:

-- white cardstock (the cheap stuff from Michael's is just fine!)
-- chalk ink color of choice (I used pink)
-- 6 scallop hearts using a punch or die (your choice of size - depending on the flower size you want to achieve). My punch is 2.5 inches = 3.5 inch flower once done!
-- 2 scallop circles using a punch or die (about half or 2/3 of the size of the heart size you use - mine is 1.5 inches). You could alternatively use a small flower punch.
-- water mister
-- brad (you will not see it so don't use a decorative one)
-- tweezers
-- paper piercer or anything to poke a small hole through 8 paper layers


NOTE: Since you need to crumple up the hearts anyways, you can always fold paper in half and cut some out with deco scissors if you don't have a die or punch. I think this would lend to an even shabbier look since the hearts wouldn't be exactly the same size. OR, this may be pretty using an Oval scallop punch (but you may need 8 to get the same effect as the 6 hearts I used).

STEP 1 - Ink your hearts and circles (or flowers) - you do not need to blend the ink.


STEP 2 - Cut a slit a every second circle scallop "valley". You may end up with odd number as I have so for the last one cut in the middle of one of the "mountains". Skip this step if using a flower punch.


STEP 3 - Water mist all of the hearts and circles and stack 4 hearts like this:


STEP 4 - Add 2 more hearts but place them a little closer to the middle than the first 4.


STEP 5 - Add your 2 circles to the pile and mist a little more


STEP 6 - Poke a hole with your paper piercer, secure the brad in the middle and start scrunching the circles toward the centre in to a tight paper wad - for nice creasing.


STEP 7 - Do the same with one heart at a time and give the entire thing a good tight squeeze. Let it sit like that for a few minutes. If your flower is very wet, you may need to let it sit for a while. You want the petals to be barely damp so that when you open it up, they curl back well instead of flatten out.


STEP 8 - Carefully pull back the hearts tips a bit and shape curved down like this:


STEP 9 - Using your tweezers, twist/shape the centre as desired. Let it dry overnight or speed things up with a heat tool until completely hardened.


DONE! That's it. No complicated tool or techniques!

Here is a variation from a past project, using only the large hearts with patterned paper and a bunch of berries instead of the circles. This worked better for a Fall layout about my boys.