With simply paper and creativity anyone can create art


Thursday, September 13, 2012

Pion Christmas Display (Pion Design/Green Tara/Helmar)

I finally had a chance to play with the beautiful Pion Design Silent Night collection. Oh wow are these papers dreamy! I did this layout style Christmas display. I haven't decided yet if I am keeping it or gifting it to someone. Please click on images to see larger view.


All of the flowers, lace and sprays are Green Tara and the chipboard is Dusty Attic (yes, I will be re-stocking these Dusty Attic pieces soon in October in my shop as  well as 2Crafty chipboard too :)

Please note this will be my final design team project for Green Tara. I know the new team starting in October will be fantastic - lots of awesome scrappy buddies of mine will be playing with Green Tara's beautiful products. Congrats ladies! 

I used the gorgeous DA September sketch by Michelle Grant as inspiration for this project.

Well, it takes a lot of Helmar sticky goodness to glue down chipboard, metal, flowers and lace. I used my two favorite products - the premium craft glue and the 450 quick dry. These two are my go-to glues for layouts! Visit the new http://helmarusa.com to shop!

Tuesday, September 11, 2012

Same collection and design done 2 ways (Pion Design/Green Tara/Helmar)

Have you ever done a layout and think what would it look like if I had used different papers of the same collection for a different gender layout? Well... I recently taught my "Live" layout through my LSS for a do-it-yourself chipboard and use-your-scraps themed class. While showing some chipboard techniques, I used pink instead of blue on the chipboard in anticipation of showcasing two versions for Pion Design.


On my original layout (featuring my son) I used the blue and yellow papers from the "For Mother"collection and several die cutting machine templates for the chipboard. On my "pink" layout I used essentially the same chipboard cuts (minus the branch) and the same design concept using the pink papers in the same paper collection but made it into a 3 image layout. I also used a lot of pretty Green Tara blooms - pink apple blossoms and roses (some of my favorite blooms!). The "pictures" are from Pion Design Vintage sheet images.


Here is a close-up of the flowers, homemade chipboard (primed, chalked and stamped) and one of the beautiful vintage images from Pion Design. This is my new display piece on my fireplace mantle - that I change every season (I'm not ready for Fall yet, LOL). The chipboard techniques include inking, stamping, chalking, and faux crackle using gesso (birdcage).


Another close-up of the birdcage with Green Tara twisted organza pearl trim (I adore this trim!).

I used a whole lot of Helmar adhesives on these projects! Especially the premium craft glue and the 450 quick dry (my 2 favorites!).

NOTE: This "pink" layout was inspired by a cross promotion with http://blog.craft-e-corner.com and Helmar for breast cancer awareness. Many awesome PINK projects created by the Helmar Design Team will appear on this site in the upcoming weeks. Pink just happens to be my favorite color to scrap with too :)


Saturday, September 8, 2012

OUAS September Challenge (using Swirlydoos and Helmar)

I used the last of my August Swirlydoos kit to create this layout for the September Once Upon A Sketch (OUAS) and Color, Stories, Inspiration (CSI) cross promotion challenge.

This is a picture of my dad and eldest son when he was little on Easter Sunday. All of the chipboard was sponsored by Imaginarium Designs and the ribbon from Scrapbook Fantasies. Hidden journaling reads: "I love to catch you in a touching moment with Grandpa - it melts my heart how much you love spending time together".

Click on images to see larger versions.


Here is a close up of some of the gorgeous embellishments from the Swirlydoos August kit.

Here is the beautiful OUAS sketch, palette and CSI criteria. Entries for this challenge are due by 2:00 pm Monday 17th of September Australian Eastern Standard Time.

For this challenge, you must use :
* the SKETCH provided
* all the colours in the SCHEME
* at least 2 elements from the EVIDENCE
* at least 1 element from the TESTIMONY!


I hope you can join in the fun and play along!


Please note that this layout was created using Helmar Adhesives (LOTS of it!).


Wednesday, September 5, 2012

Swirlydoos September Kit Blog Hop

Welcome to Swirlydoos' September Kit Reveal
and Blog Hop Block Party!

If you came here from Heidi's blog, then you are on the right track. If not, go back to Swirlydoos' blog and start from there. We have some amazing projects for you to see today!You have until midnight, eastern time, on Friday, September 7th to complete the hop. Click on my images to see larger versions.

This month's September "Inspiration" kit features the gorgeous Prima Romance Novel papers and so many amazing embellishments. Here is a picture of my daughter last summer. I adore this paper and photo too!


Here is a close-up of the flowers - some from the main kit and some from the add-on.

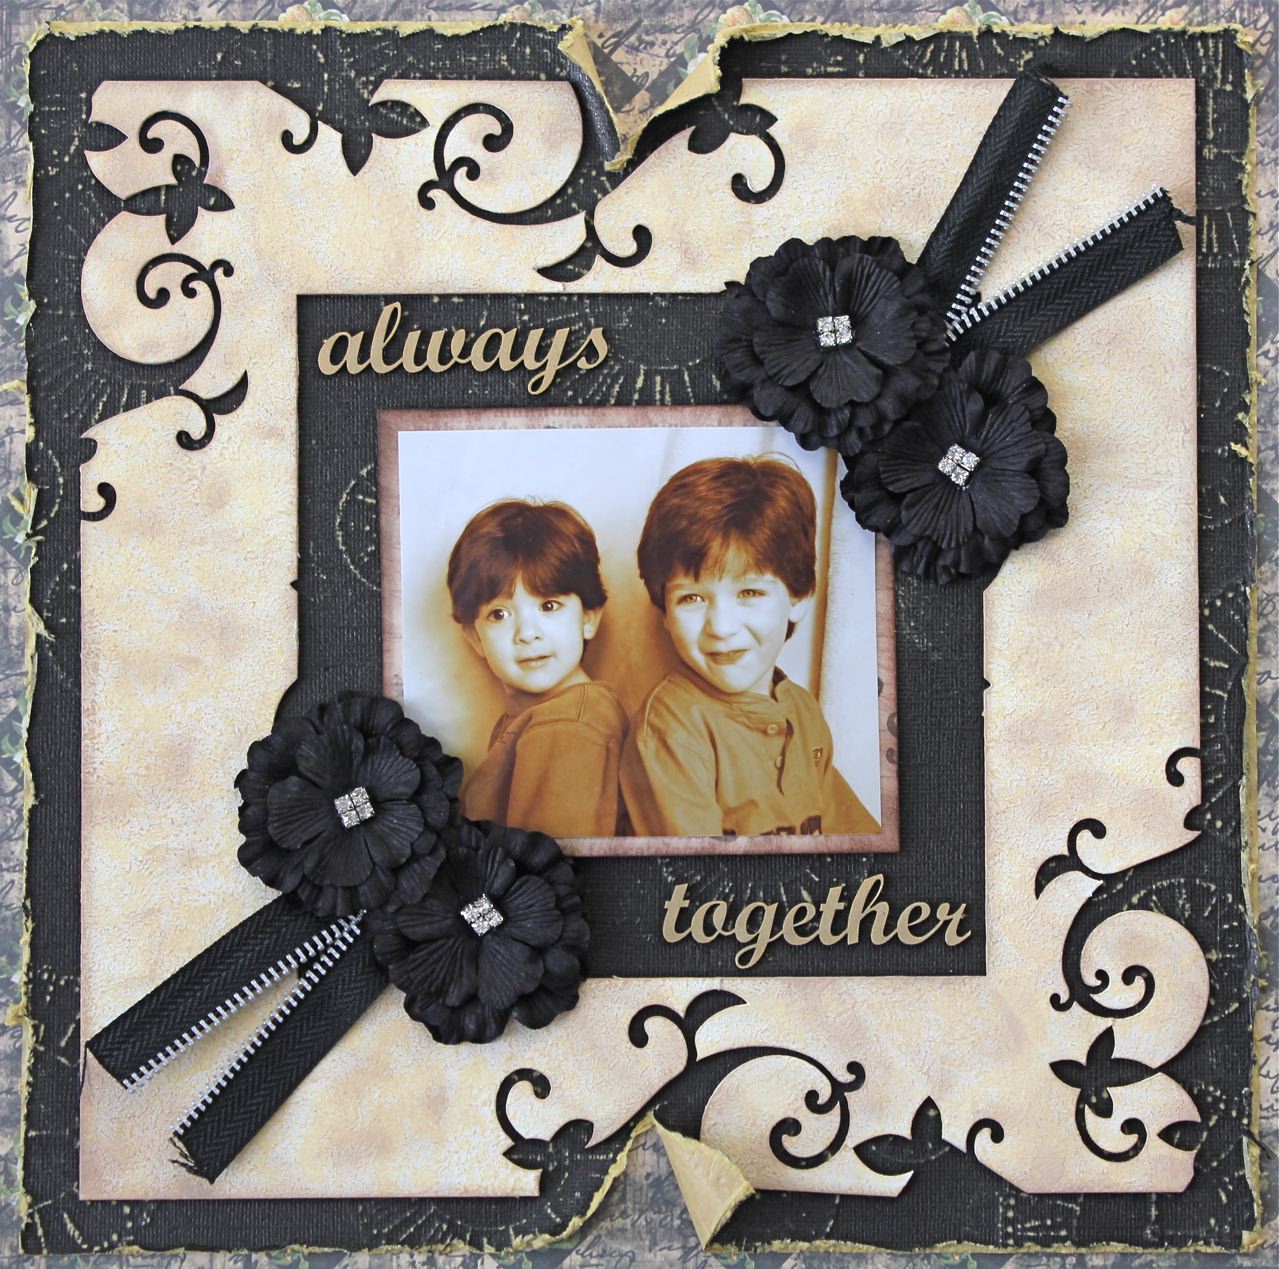
I decided to play with the Coredinations paper in the kit that you can sand to reveal the embossed clocks. It goes so well with the Prima papers for this boy layout of my sons as toddlers. There was a fun zipper trim and some gorgeous black flowers in this kit too. The chipboard is from my stash (the frame is actually the "negative" part of a Dusty Attic sweat pea set that you're supposed to discard).

Here is a close up view of the flowers and zipper. The frame was finished by stippling a variety of paints and inks.

Lastly, this is one of my favorite pictures with my daughter when she was 9 months old. She fell asleep on me during a photo shoot. I wasn't a fan of the black background used but it works for this layout. I added some doilies and 2Crafty chipboard from my stash on this layout.

The above layout was inspired by the kit sketch - gorgeous sketches as always in the kits!

Here is a close-up of the chipboard and flowers. The black chipboard was crackle painted and the cream one was painted and inked.

You have until midnight, eastern time, on Friday, September 7th to complete the hop.

Winners will be announced on the Swirlydoos Blog on Saturday the 8th. In order to qualify to win here is what you need to do:


1: Visit all of the blogs and leave a comment on each.

This way we know you were there. Become a follower if you're not already. Take your time. There are REALLY beautiful things to see along the way.

2: Before you leave each blog, look for the “special” words and write it down. 
Once you have visited all the blogs and collected all the special words, they will create a sentemce. 

3: Finally, go back to the Swirlydoos blog and leave a comment.
Let us know how much fun you had, tell us the sentence that was created with all of the special words you collected.
Can't wait to hear from you!


My special word is: Stupidity


The party continues over at Tiffany's blog. Have fun!


Please note: These layouts were all glued together using my favorite Helmar adhesives.


Thursday, August 23, 2012

Catching Waves Frame (Helmar/2Crafty)

Well it's been a CRAZY busy and really HOT summer but I've managed to squeeze in a bit of crafting this week. Here is an altered frame I made for Helmar's Decoupage Craft Paste feature week. I also used a bunch of goodies from the Robin's Nest - a preferred partner of Helmar's (Fleur cardstock and shells) and . I couldn't resist also adding some very awesome 2Crafty chipboard to polish things off (catching waves title and a piece of the swirly bird branch).


I started with a plain $1 wooden frame and adhered the beautiful Robin's Nest Fleur collection paper to the frame using a foam brush to apply the decoupage glue, sanded the edges and applied some brown chalk ink to the edges. Let me just say that this was my first time using the decoupage paste and it went on soooo much smoother than anything else I've ever used!

 I then gathered the paper for the photo mat, shells and some Robin's Nest dew drops. For the photo mat I also used the decoupage glue to adhere the paper to the cardboard backing that came with the frame. Please note that this frame is a birthday gift and I decided I will add the dew drops after my friend chooses a picture (just so that the "water splash" drops are in the right spots). The frame is meant for a 4x6 picture but I think it would be nice to put a 3x5 to see an inch around of the beautiful darker paper.

Here is a close-up of the pretty coordinating papers and the gorgeous 2Crafty chipboard. On the chipboard I primed it with gesso, chalk inked it with several brown inks and then glimmer misted here and there for a bit of gold highlights.

Here is a close-up of the beautiful shells. I just added a bit of dollar store twine netting and left it natural but it could be misted if desired (on a grungy project). You can see the same inks and mists were used on the swirl branch chipboard too (love this chipboard design!). I glued the chipboard and shells with my favorite magic potion - Helmar's 450 quick dry. This stuff really is sticky heaven - strong holding, dries clear and acid-free. To preserve this finished frame, I sprayed with Helmar Crystal Kote Matte Spray. Oh and I plan on adding the dew drops using Helmar's gemstone glue of course so the clear beads don't look cloudy - it is simply the best for gems!

I kinda have to admit I want to keep this one for myself but I know my friend will appreciate it for her upcoming birthday - she really loves the beach! Don't we all though?

BLOG EDIT: I just realized that this projects revealed a few hours before TCR palette #125 release coordinates sooo perfectly for this week's challenge -- all by chance, too funny!


LITTLE UPDATE:
Sorry that I've been missing for several weeks in the forums and galleries and blogs but I've have had 6 or 7 kids to take care of each day for most of the summer, guests stay with us, summer vacation mishaps (including sick kid among so many other things) and now I am really behind on EVERYTHING! Hopefully life will slow down in September to catch up with all my online friends.


Tuesday, August 21, 2012

Pion Design's Christmas Collection!

Ohhh, Ahhhh - I just can't wait for this newly released Pion Design "Silent Night" collection to arrive on my doorstep.  Looks so soft and pretty and I know in real light their papers are always so divine.  What a dreamy collection to preserve those special holiday moments!  Available in 12"x12" and 6"x6" sizes! Here is a sneak of the entire collection but close-ups are viewable on their website.


Friday, August 17, 2012

You are so beautiful to me (Meg's Garden/2Crafty/Helmar)

My post today is showcasing a DT layout made using Meg's Garden papers (and embellishments from her store), 2Crafty chipboard and Helmar adhesives.

This is a picture of my daughter on her first birthday. Everything on this layout with exception to the chipboard came from Meg's Garden Store. The beautiful papers are from the "Forget Me Not" and "Le Belle Jardin" collections. I just love how you can mix and match the collections so well.

Here is a close-up of the peek-a-boo lace (great way to use my Green Tara lace scraps!) and the chipboard title. I used white distress crackle paint and then smudged light yellow and brown chalk ink to give the cracks and edges some definition. See how the papers look hand stamped - so gorgeous!
Here is a close-up of the beautiful blooms Dusty Attic blooms and corner vines leaves. I primed the chipboard with gesso and used a few green and brown inks to polish it off. It really makes the delicate white blooms stand out don't you think?
To stick it all down, I used Helmar premium craft glue for the paper layers, 450 quick dry for the embellishments and acid-free glue for the photo.

Thanks for dropping by today!

Thursday, August 9, 2012

Swirlydoos August Reveal Blog Hop

It's Swirlydoos' August Reveal Blog Hop Block Party!

If you came here from the Swirlydoos blog, then you are on the right track.  If not, go back to Swirlydoos and start from there.  We have some amazing projects for you to see today on this blog hop!

This August "Vintage Traditions" kit features the awesome 7Gypsies Trousseau collection - vintage inspired and sooo gorgeous! It is perfect for shabby chic layouts and distressing. First up is a baby picture of my daughter that I've been waiting for the perfect papers to scrap it. I used some 2Crafty chipboard and a heart doily from my stash on this but the rest is all from Swirlydoos. I used my Zutter-Distrezz-it-all tool to create the rugged white paper edges.
Here is a close-up of the beautiful lace and stick pins in the main kit.
I added some pearls to the middle of the black flowers to add contrast with Helmar gemstone glue.
I used the amazing Swirlydoos kit sketch as inspiration for this layout.
For my second project, I went for a softer look to compliment the vintage picture. The little boy is my dad when he first arrived to Canada from Portugal. Aren't those little Prima gates from the embellishment add-on kit so cute? Helmar's 450 quick dry is the perfect glue for metal embellishments. I used a white-washed distressing technique around the edges of the papers to soften the edges.
Here is a close-up of my large handmade flower.
Lastly for today, here is yet another baby picture of my daughter but this time with Grandpa (the one in the previous layout as a kid :) Again, I used 2Crafty chipboard from my stash on this layout... and those butterflies? Those are from fellow Swirlydoos DT member Angelica's Etsy shop.
Here is a close up of the pretty blooms in the main kit.

You have until midnight, eastern time, on Sunday, August 12th to complete the hop. Winners will be announced on the Swirlydoos Blog on Monday the 13th.  In order to qualify to win here is what you need to do:

1: Visit all of the blogs and leave a comment on each. This way we know you were there. Become a follower if you're not already. Take your time. There are REALLY beautiful things to see along the way.

2: Before you leave each blog, look for the “special” words and write then down. Once you have visited all the blogs and collected all the special words, they will create a sentence.

3: Finally, go back to the Swirlydoos blog and leave a comment letting us know how much fun you had, tell us the sentence that was created with all of the special words you collected. Can't wait to hear from you.

My special word is : ONCE
The party continues over at Angelica's blog.
Have fun and thanks for visiting today!

Wednesday, August 1, 2012

OUAS August Challenge (using Swirlydoos July kit and Helmar Adhesives)

This is a layout I made using the beautiful August sketch challenge at Once Upon a Sketch. I created it using the remaining papers and a few embellies from my July Swirlydoos "The Paper Doll" kit featuring KaiserCraft papers (The Lakehouse collection). That's me and my daughter when she was a baby. I had no make-up and didn't do my hair and I still love the photo, LOL. The hidden journaling reads "It's the little moments with you at the park and beach that make my summer fun."


The theme this month is "Seasons" - I obviously chose summer. Here is the beautiful sketch to accompany the theme...

Here is a close-up detail of the Dusty Attic chipboard in the kit. I wanted it to look like stone and created this look with gesso and chalk inks and my fingers to apply it all.

Be sure to enter the OUAS challenge this month - check out the blog for details and ALL the gorgeous prizes up for grabs too! Please note that I used Helmar premium craft glue for all the paper layers, the adhesive runner for the photo and 450 quick dry for the embellishments.

Tuesday, July 31, 2012

Card set with Susan Weckesser papers (Helmar and Green Tara)

Here is a fun little card set I made with the brand new whimsical paper line "Live in Color" by Susan Weckesser (she is also on the Helmar DT and a fellow Canadian designer). I had so much fun designing with a paper style that I don't usually gravitate towards but the colors and sentiments are just so very sweet. Green Tara embellishments were a perfect touch to add to the sweetness of this paper line (details at the end of this post). I used Helmar's Premium Glue for the paper layers, the adhesive runner for the delicate doilies and 450 quick dry for the embellishments. The papers can be purchased through one of Helmar's preferred partners Want2Scrap. They are REALLY thick and great to distress with!


I also used the August Helmar challenge as inspiration. Be sure to enter this month for a change to win some sticky goodies!

Can you spot the staples, buttons, banner and flower frame in my card set? Here is a close up of each to help you spot the challenge details. The first one is a trick, it's just an extra card I made with my scraps after the first 3 were done - I just love pink (and even numbers, LOL)!


Be sure to check out more creations with the paper line during Helmar's cross promotion.

There are also some great newly released Unity Stamps that coordinate with Susan's paper line and they are on sale right now - check it out!

Green Tara Products used:

CODE: FDV044Iv5
CODE: FLC22B
CODE: FDS026BatV4
CODE: PFSTC
CODE: PFST1
CODE: RB797Wh
CODE: RB244P/W

OK one last thing today, my friend, fellow Canadian, and Helmar (and Green Tara) DT mate JJ Sobey is giving away a FABULOUS Faber-Castell (another fantastic Helmar preferred partner) prize pack but hurry, only 2 more days to enter so check it out! Oh I can't even begin to tell you how much fun these products are to play with.


Monday, July 30, 2012

The Spring Paisley Collection (Meg's Garden)

As we North Americans are in full Summer mode, Australians are in deep Winter right now and looking forward to Spring! Meg's Garden just released The Spring Paisley Collection with beautiful florals (signature style) and a hint of dark contrast. Can't wait to play with this new collection!

Sunday, July 22, 2012

Fun little Notepad (Helmar Adhesives and preferred partners)

Sorry it's been quiet on here for a bit, been really busy creating but mostly things to be revealed in August. Today I do have a share though...


The Helmar DT received a generous parcel of Faber-Castell and Robin's Nest products to play with. I had this little plain white die cut notepad (from the Michael's Crafts dollar bin). I started to play with the PITT pastel pencils, Art Grip Aquarelle watercolor pencils and PITT marker pens and big brushes, really late one night. At the end of playing, I "washed" the entire thing by lightly brushing it over with water and a paintbrush so the colors would blend.

Then, the next day, in real light... I realized it needed some sheen so I took a pink Gelato and smeared it on my finger and rubbed the entire surface. 

Here is a look at some of the Faber Castell products I used:


 I also added some punched butterflies and Dew Drops from the Robin's Nest. I used Helmar Gemstone Glue to add the drops since that glue doesn't make the acrylic look cloudy and gives a REALLY strong hold.

I used some of the off-white and clear beads from the Fairy Dust Dew Drops set.

Well there you have it - a little late night experiment turned into a wonderful notepad for my daughter. She loves to draw and stamp while I craft so I thought she'd really like her own little art booklet.

OK, I don't usually post things like this but it's too good not to pass up. Ingvild Bolme is doing a massive Prima Giveaway on her blog to celebrate her new blog design. Look at that gorgeous mountain of goodness!!! Just spreading the word :)