With simply paper and creativity anyone can create art


Monday, June 3, 2013

Swirlydoos June Kit Reveal Blog Hop


Welcome to the Swirlydoos "Brass Shilling"
June kit reveal blog hop party!

If you came here from Angelica's blog, then you are on the right track. If not, go back to the Swirlydoos blog and start from there. We have some amazing projects for you to see today! Make sure to leave a comment on all of the blogs for a chance to win prizes for participation in this hop. Also, be sure to check out Swirlydoos on Facebook and "Like Us" too!

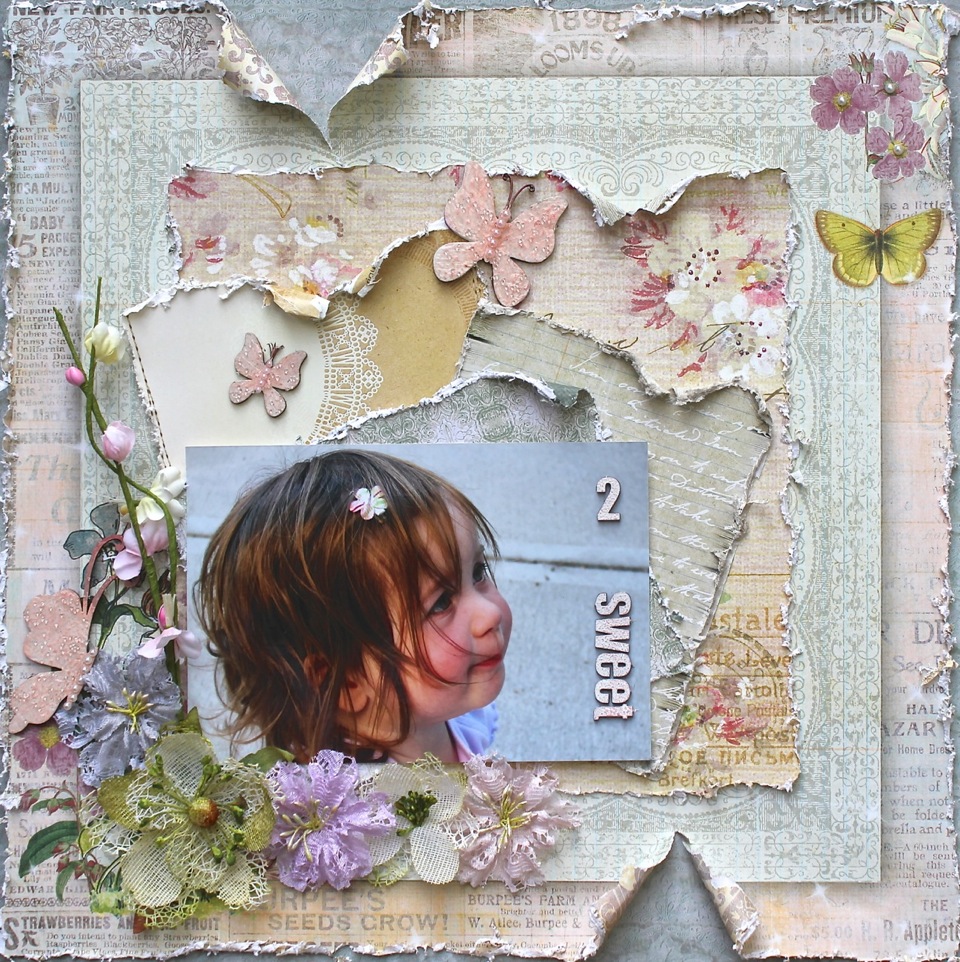
This classy kit is so versatile for any age, gender or anything you want to scrap about. The Kaisercraft 75 cents papers are soooo awesome! First up is a picture of my daughter as an infant in the kiddie pool. I created this layout to kick-off week 1 of the June Swirlydoos Round Robin Challenge. I did the doily and lace twist and then added Dusty Attic chipboard from my stash (the rest is all from the main kit). Don't you just LOVE that wide yellow ribbon?

Click on images for larger view.

A little close-up. I used glass bead gel on the chipboard (from a previous Swirlydoos kit).

Next is a photo printing "mistake" that I've held on to for a while of my boys as toddlers. I went for a minimalistic look... and did you notice? No flowers on this layout! That's a first for me.

Here is a close up of the Dusty Attic chipboard (from my stash) that I painted with the gold Silks paint in the kit. I love this paint - no gesso primer needed!

This is the pretty kit sketch I used as inspiration (as rotated):

For this next layout, I played off the orange flowers in my picture and used more of the gorgeous gold paint in the kit.

Here is a close up of the fabric flowers in the add-on and some DA chipboard from my stash.

Lastly for today, I have made a card to share.

You have until midnight, Eastern time, on Tuesday 6/4 to complete the hop. Winners will be announced on the Swirlydoos Blog on Wednesday 6/5. In order to qualify to win here is what you need to do:

1: Visit all of the blogs and leave a comment on each. This way we know you were there. Become a follower if you're not already. Take your time. There are REALLY beautiful things to see along the way.

2: Before you leave each blog, look for the “special” words and write it down.
Once you have visited all the blogs and collected all the special words, they will create a sentence.

3: Finally, go back to the Swirlydoos blog and leave a comment letting us know how much fun you had, tell us the sentence that was created with all of the special words you collected. Can't wait to hear from you.

Here is a peek at the Swirlydoos "Brass Shilling" main kit and add-ons. To become a subscriber and never miss a gorgeous Swirlydoos kit click here.


My special words are: STOP TO
The party continues over at Andie's blog
Have fun!

I still have LOTS more of my kit to play with and will be back soon to reveal 2 more projects. Please note that all of these projects above are made with 80% the kit contents and a few items from my stash or past Swirlydoos kits.

Wednesday, May 29, 2013

More May Swirlydoos/ Dusty Attic projects (+ tutorial)

I'm back with more Swirlydoos Kits and Dusty Attic Chipboard DT projects to share. Here is a layout (and tutorial below) that I created using the gorgeous chipboard Floral Frame Set (DA0576) to complement my beautiful "Au Naturale" May kit from Swirlydoos (featuring Pink Paislee and Prima papers and gorgeous embellishments). I have been wanting to scrap this childhood picture of my husband and his brothers for so long and finally had the perfect papers and embellishments for it.

Click on images for larger views

For the floral piece, I randomly painted it with gesso, putting more in some places than others, especially on the flowers.

Next, I used light green and teal chalk ink. As you can see, the spots that had more gesso are much lighter than the others. This gives a more natural look than an all over wash of colour.

I then added some darker green and brown chalk ink and rubbed it with Q-tips to reveal the lighter colour underneath in several places (especially the middle of the teal flowers). Once dry, I glued the piece onto my paper and cut a bit of the right chipboard edge off that was hanging over.

Next, I filled in the middle of the flowers with baby blue Stickles glitter glue.

The Happy Memories title (DA0732) was a perfect font and description of this fun fishing experience too. For the title, I simply inked the pieces with dark green chalk ink and then splashed some green Pesto paint (DA0918), here and there on it. I also added the paint to the felt leaves that surround the large brown flower. Adding the Pesto paint gave everything a moss look to it. I love the rustic look all of these techniques created to complement the nature setting of this picture (taken well over 30 year ago!) amoung the pretty Pink Paislee papers in the Swirlydoos kit.

Another fun theme for this month's Dusty Attic ATC challenge is Art Deco style. I found a great inspiration image and my ATC easily fell into place from there using the Prima papers in the Swirlydoos kit. I added a chipboard Cameo Ribbon Slide from the 5/pack (DA0658), painted it with Vintage Gold (DA0925) and topped it with Clear Gloss Varnish (DA0901).  I created my ATC background by using a small circle punch and mounted the circles onto black cardstock, then added some kit bling in the corners and a patterned paper backing. Finally, I polished it off with a beautiful resin cameo in the middle (from a past kit).

Here is the beautiful image I found on Pinterest as my inspiration for this project.

I easily turned my ATC into a pretty card by mounting it on black cardstock and adding more bling corners. The repetitive corners really add to the art deco style.

Here is a look at the Swirlydoos kit: "Au Naturale" main kit (middle) and add-ons. To become a subscriber and never miss a gorgeous Swirlydoos kit click here.


Thursday, May 23, 2013

20% off Dusty Attic Chipboard (coupon code for my Etsy)


A little birdie told me there will be another new Dusty Attic chipboard release soon. So, I thought it would be a good time to do a "SPRING2013" cleaning sale in my Etsy (https://www.etsy.com/shop/vickyalberto) to make room for the new stuff.

When you spend over $15.00 in my Etsy, you will receive 20% off your purchase. Enter the coupon code SPRING2013 upon checkout in the area provided for it to receive the 20% discount off your order. This offer expires on June 30, 2013. 

HOW TO ENTER AN ETSY DISCOUNT CODE
Once you've added items to your cart, on the right, click Apply shop coupon code above Item total BEFORE you checkout. Then enter the coupon code SPRING2013 and click Apply. The coupon discount will adjust your total before you submit the order (only works on orders over $15.00). Here is an Etsy screen shot (example only) to show you the blue link you need to click to enter the code:

Wednesday, May 15, 2013

Swirlydoos May Kit Reveal

Welcome to the Swirlydoos "Au Naturale"
May kit reveal blog hop party!

If you came here from Andie's blog, then you are on the right track. If not, go back to the Swirlydoos blog and start from there. We have some amazing projects for you to see today! Make sure to leave a comment on all of the blogs for a chance to win prizes for participation in this hop. Also, be sure to check out Swirlydoos on Facebook and "Like Us" too!

I was over the moon excited when I found out that the May kit had Prima's Lyric papers paired with Pink Paislee's Hope Chest... two of my favourite collections this season! This is a picture of my brother in-law and his new bride. I added a large Dusty Attic skeleton clock from my stash to complement this kit. BTW - the flower add-on this month so heavenly.

Click on images for larger view.

Here is the SUPER gorgeous sketch I used from this month's kit (I flipped it). I think this is my all time favourite Swirly-sketch!

This is a picture of me at 5 years old when I fell asleep at a wedding. I used Prima's May Palette as inspiration and added a Dusty Attic chipboard title to complement this amazing kit. Really cool circle elements this month!

I just love making gift boxes, for this one I used only one single sheet of paper, one flower and a template from DigiChick. It is a really nice size to hold treats or even a gift card.

This is what the cupcake gift box looks like before assembling it.

A little thank-you card I made using some left-overs from cut papers (to match the gift box).

Here is a jar similar to the one I made for National Scrapbook Day, using a flower from my new Pearl and Lace Flower tutorial (no sewing required!). Also, see the homemade foot scrub recipe that can go into the jar to make a wonderful end of the school year teacher gift.
You have until midnight, eastern time, on Friday 5/17 to complete the hop. Winners will be announced on the Swirlydoos Blog on Saturday 5/18. In order to qualify to win here is what you need to do:

1: Visit all of the blogs and leave a comment on each. This way we know you were there. Become a follower if you're not already. Take your time. There are REALLY beautiful things to see along the way.

2: Before you leave each blog, look for the “special” words and write it down.
Once you have visited all the blogs and collected all the special words, they will create a sentence.

3: Finally, go back to the Swirlydoos blog and leave a comment letting us know how much fun you had, tell us the sentence that was created with all of the special words you collected. Can't wait to hear from you.

Lastly, here is a peek at the Swirlydoos "Au Naturale" main kit (middle) and add-ons. To become a subscriber and never miss a gorgeous Swirlydoos kit click here.

My special word is: WHAT
The party continues over at Rae's blog.
Have fun!

I still have LOTS more of my kit to play with and will be back soon to reveal 2 more projects.

Saturday, May 4, 2013

Swirlydoos NSD Challenge!

Right now the Swirlydoos design team is hosting a bunch of fantastic challenges in honour of National Scrapbook Day (but you have a week to complete them). Great fun and prizes to be won!

Visit the Swirlydoos Forum to see all of the challenges.
For my Pearl and Lace Flower tutorial see previous post.


MY CHALLENGE:
1. You will need to create a flower using my Pearl and Lace Flower tutorial (in the previous post).


2. Use your handmade flower(s) on any project of your choice. If you would like to make an altered mason jar (as I am doing), you will need a clean glass jar, paint (I used white Martha Stewart multi-surface paint because it stays well on glass without the expense of glass paint - and it can even be hand-washed after curing), plus any other embellishments of your choice.

3. Post your project in my thread on the Swirlydoos forum at: http://www.swirlydoos.com/sd_plugins/forum/forum_viewtopic.php?207305


Here is a great recipe idea to fill the jar with...
(makes a wonderful mother's day or teacher gift)

LEMON PEPPERMINT FOOT SCRUB RECIPE
(adapted from a www.freutcake.com recipe)

- 2 cups coarse salt or sea salt
- 1/2 cup almond or coconut oil
- 2 tsp lemon zest (grated lemon peel)
- 10 drops of peppermint essential oil (aromatherapy)
- 2-3 drops of yellow food colouring
*Mix well and store it in the fridge. Enjoy!

There will be special prizes for the challenges and also great promotions later on today in the online store.


Pearl and Lace Flower Tutorial (no sewing!)

I am so excited to share another flower tutorial.


Materials you will need:
-- 3 or 4 feet of small string pearls
-- 3 or 4 feet of narrow and thin/sheer ribbon (I used seam binding)
-- 3 or 4 feet of narrow lace trim
-- a small punched paper circle (I used 1-inch diameter)
-- loose pearls or gems of your choice
-- strong holding glue (like hot glue or Helmar 450 quick dry)
-- clear, fast drying glue to use on the pearls/gems
OPTION: inks/mists to tint the ribbon BEFORE making the flower.

NOTE: I used 4 feet of each trim to yield the large 4-inch cream flower and only 3 feet of trim for the smaller pink 3-inch flower.

STEP 1: Wrap all 3 trims around your 4 fingers, holding the ends with your thumb. Twist the 3 trims as you go so you don't end up with all the same style on one side. NOTE: If you are only using 3 feet of trim, then only wrap around 3 fingers for a smaller flower diameter.

STEP 2: Once you reach the second set of ends, take just the ribbon (my white seam binding) and wrap it through the middle to secure everything into a bow shape. NOTE: This will be a little harder if you only use 3 feet of trim and 3 fingers.

STEP 3: Carefully slip it off your fingers and very, VERY tightly tie the two ribbon ends together (my white seam binding).

STEP 4: Gently start shaping your flower by spreading out the trims. You may need to loop things together to get a nice round shape.

STEP 5: Put a generous amount of strong holding glue on the tied knot and tuck loose ends into it - secure by pressing your paper circle over top. Let it dry.

STEP 6: Flip it over and glue a bunch of pearls or gems to create a cluster in the middle - using clear, fast drying glue.

This flower may cost as much to make as it would to buy a premium fabric Prima flower... but the result is worth it. Best of all you can make it in any color or size you need :)

Please let me know what you think of this new tutorial!

Thursday, May 2, 2013

Thoughts

I rarely share this kind of stuff BUT, felt the need today...
click on image to see larger


Tuesday, April 30, 2013

2 sweet (Swirlydoos/ OUAS/ Dusty Attic)

I'm back with another project using my pretty April "Hello Beautiful" kit from Swirlydoos - plus some of newer Dusty Attic chipboard styles (butterflies, numbers and letters). I also used the gorgeous Once Upon a Sketch (OUAS) May challenge sketch.

Click on images for larger view.
Journaling on the back of the layout reads:
"This is sweet little you at the tender age of 2... a perfect little bundle of wonder and joy."

Here is a close-up of some of the Prima flower packaging I used and the pretty Dusty Attic butterflies. Isn't glass bead gel fantastic stuff to use on chipboard? There was a tub of it in the Swirlydoos technique kit this month.

This is a peek at the amazing kit flowers that came out of the pretty packaging!

Here is the awesome sketch I used. The theme this month is number(s). Check out the full once Upon a Sketch DT reveal and challenge details/prizes.

Sadly this will be my final reveal for the OUAS design team. Huge hugs to Nadia and all of the wonderful ladies on the DT... it has been an honour to work alongside such talented people.

Monday, April 29, 2013

"Sublime" (Meg's Garden/ Dusty Attic)

On this project I have used a combination of beautiful papers from Meg's Garden (The Spring Paisley and Ode to a Summer's day collections). I then added some fabulous Dusty Attic chipboard and Prima flowers as well as resin to frame the photo. Lastly, I balanced the layout by revealing a square doily behind some rolled edges. I just adore the birds on a branch chipboard (DA0594) - perfect to suit this layout scene of my mom on her wedding day (and my grandparents in the background). I also used a the word "sublime" from a mini word pack (DA0476) as my title.


I primed the birds on a branch and title pieces with gesso. Next, I used several chalk inks on the branch starting from light colours to dark until I achieved the natural "look" I wanted. As for the title, the gesso was a perfect match to the resin shutters  - so I left it alone. It created a nice dull white frame around the photo.

This is my final DT project for Mag's Garden. I would just like take this opportunity to thank Meg for letting me serve on this wonderful design team for the past year, it has been a true pleasure!


Saturday, April 27, 2013

Dusty Attic Moroccan ATC

Here is a little ATC inspired by the Moroccan theme from Dusty Attic this month. Ohhhh this was such a fun one to create! I used three of the newer chipboard styles:

1. ATC frame style #4 DA0876 (3 per pack)
I simply inked this piece, leaving some of the bare chipboard showing.

2. Shield DA0831 (15 per pack - variety of styles)
For perfectly even coverage, I painted this piece with the Raisin acrylic paint DA0909 .

3. Moroccan Design - DA0838 (3 per pack)
I coated this with texture effects paste and then went over it with metallic distress stains.

Now, what can I create to incorporate this little treasure? That is the question :)

Monday, April 15, 2013

Swirlydoos April Blog Hop

Welcome to the Swirlydoos Hello Beautiful
April kit reveal blog hop party!

If you came here from Heidi's blog, then you are on the right track. If not, go back to the Swirlydoos blog and start from there. We have some amazing projects for you to see today and special guest blogs to visit (which means TERRIFIC PRIZES TOO!). Make sure to leave a comment on all of the blogs for a chance to win prizes for participation in this hop. Also, be sure to check out Swirlydoos on Facebook and Like Us too!

Well this kit is called "Hello Beautiful" for a good reason - it is downright GORGEOUS! It really inspired me to think outside my comfort zone of creating layouts. Up first is an altered wooden tissue box cover (from Michael's Crafts) that was inspired by the April Prima PPP colour challenge. I used a few Dusty Attic chipboard pieces from my stash to complement this pretty kit (the Paris post mark and I cut up a corner flourish). BTW - I just LOVED the cream Petaloo trim pack in the main kit and have used it on almost every project!

Click on images for larger views.

Check out the gorgeous Prima flowers this month (both in the main kit and the add-on)

Up next is a card featuring more of the gorgeous embellishments (and a brand new Dusty Attic chipboard piece from my stash - "elegant flourish")

Pretty Petaloo flowers in the add-on kit!

Earlier this month I posted my large shabby rose tutorial and decided to use the finished handmade rose as a topper for this altered jar. I surrounded my rose with a few buds from a past Swirlydoos kit. What's in the jar? Homemade bath salts.

Bath salt recipe (mix together very well):
1 cup epsom salts
1/4 cup coarse salt or sea salt
A few drops of food colouring
A few drops of essential oil (optional - for aromatherapy)

Here is a top view. Gorgeous Prima wooden elements to work with in this kit!

Lastly I altered a few headbands (from my local dollar store) using entirely main kit contents except for the tiny pink roses. This kit is packed with pretty flowers, trims and chipboard/wooden elements.

You have until midnight, eastern time, on Wednesday 4/17 to complete the hop. Winners will be announced on the Swirlydoos Blog on Thursday 4/18. In order to qualify to win here is what you need to do:

1: Visit all of the blogs and leave a comment on each. This way we know you were there. Become a follower if you're not already. Take your time. There are REALLY beautiful things to see along the way.

2: Before you leave each blog, look for the “special” words and write it down.
Once you have visited all the blogs and collected all the special words, they will create a sentence.

3: Finally, go back to the Swirlydoos blog and leave a comment letting us know how much fun you had, tell us the sentence that was created with all of the special words you collected. Can't wait to hear from you.

Lastly, here is a peek at the Swirlydoos "Hello Beautiful" main kit. To become a subscriber and never miss a gorgeous Swirlydoos kit click here.

My special word is: Thinking
The party continues over at The Swirlydoos Blog.
Have fun!

NOTE: I used a lot of Helmar goodness to stick all of my projects together. It takes some serious sticky stuff for altered projects. Loads of Helmar 450 quick dry on EVERY project, gemstone glue, decoupage paste and premium craft glue were also used to hold everything perfectly into place.

I still have LOTS more of my kit to play with and will be back soon to reveal more projects.