With simply paper and creativity anyone can create art


Monday, July 19, 2010

MME Sketch Challenge

I took a little break from my August Scrap That! DT work to sneak in a layout for the MME "hope" sketch challenge #13.

This is my daughter at 9 months old... the photographer had this huge paper mache easter egg, too cute. I used a few different MME "bella bella" collection papers. A lot were my scraps from a project I am making for the local store I design for. Left over Prima bling from the other project too!


Design tip: Use the Martha Stewart lace punch and cut up the strip and glue sections behind a circle to create a scallop lace border.

OK, so if you're wondering where I got the pink shabby flowers, blue roses and the doily from? Well... they are unique products I will be selling in my very soon to open Etsy shop(at very reasonable prices). These are not your run of the mill dollar store flowers and doilies either... they are archival safe paper-crafting ones. All of my products will be acid free and alterable.


Some of these items will also be featured in an upcoming Scrap That! kit so stay tuned! There is so much more product to be revealed soon.

Wednesday, July 7, 2010

Shabby Crinkle Flower Tutorial

Here is a smaller, easier flower than my elegant ruffled flowers... for those who like the tattered look (and don't have the patience to do the other ones, LOL). They are more "forgiving" that the ruffled ones, a lot easier to manipulate and so much faster results. My flowers are 2 inches in diameter, using 1 and 2 inch flower punches (but use any die cuts you have). It's a great way to use your scraps since you don't need a lot of paper!


Here is what you need... 3 medium flowers, 3 small flowers and something for leaves (a green pointed petal flower works well), tweezers, water mister and glue. I lightly pre-inked the edges.

Step 1: Lightly mist the 3 medium flowers and crinkle them into a ball.

Step 2: Immediately unravel and use tweezers to gently twist each petal and push towards the center. Before removing tweezers gently pinch in place. Also mist the 3 small flowers and do the same twisting (they are too small to crinkle and there is no need). Let them all dry now.

Step 3: Gently unravel the medium flowers and 2 small ones. For the last small one, squish the petals together and pinch the bottom - this will be your center.

Step 4: Assemble your flower by off setting the petals as you glue. NOTE: you can omit the the pinched center and add a brad or gem instead if desired.

Step 5: Once it is glued, squish the entire flower towards the center to give the crinkle effect and then glue on the "leaves" if you wish.

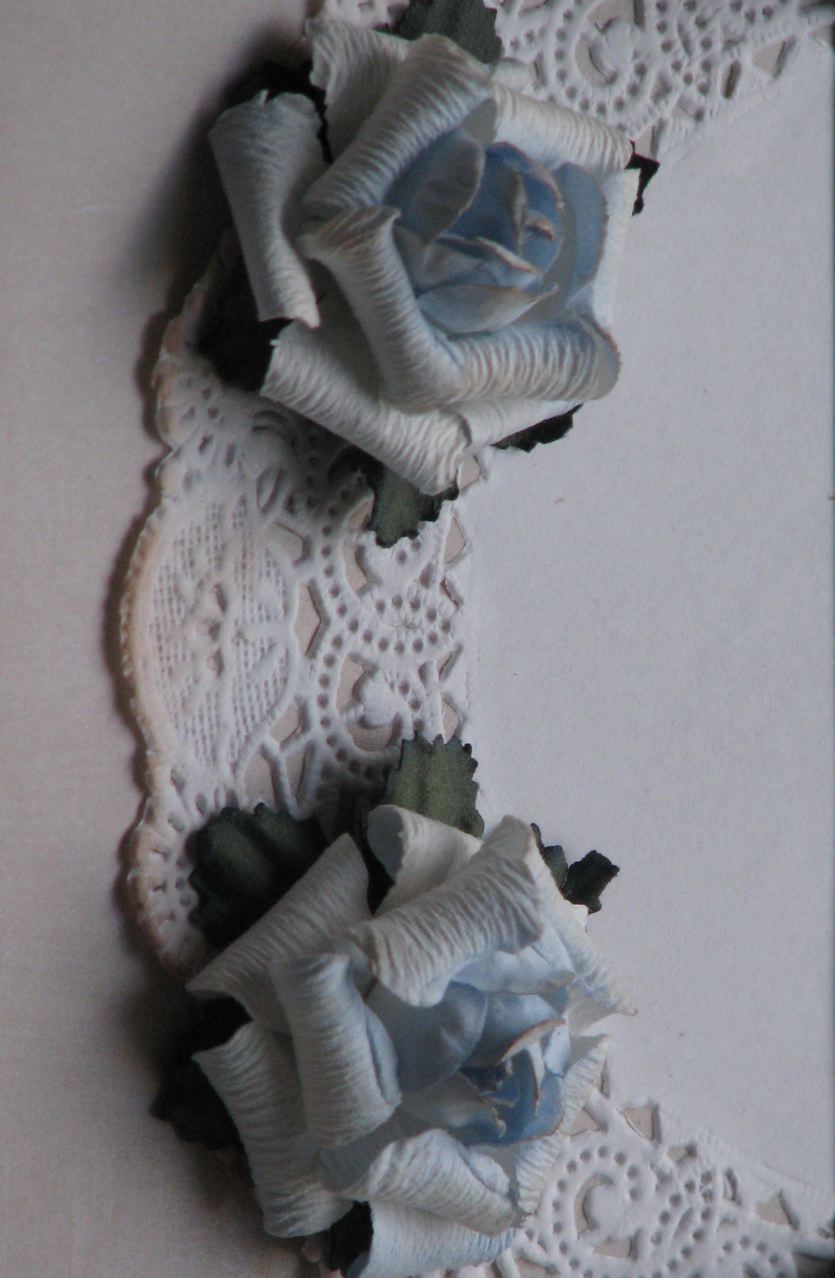
That's it! Here is a side by side comparison beside my larger layered ruffle flowers.

NOTE: you can also use this type of flower center in my ruffled flowers as pictured below in the larger white one. Experiment and have fun! Add chalk ink, Glimmer mist, Stickles etc. for more sheen and dimension too! All I ask is that you please give credit where due (to ANY artist) because tutorials take a lot of time to produce. Thanks!
NOTE: the smaller white one pictured above is the result if you don't do step 5 and squish the flower towards the center once glued. It looks more like a Prima Camelot flower that way.

Well, although I have a lot more flower tutorials up my sleeve... I need to take a break because my August SCRAP THAT! DT kit just arrived (it's gorgeous!). I have lots of work to do before the project reveals on July 26th.


Monday, July 5, 2010

Elegant ruffled flower tutorial

OK, so I have been researching techniques to manipulate paper to create ruffled flowers for a while now. I actually combined three paper techniques that I found on You Tube and came up with my own ruffled flowers. These take a bit of patience but turn out wonderfully.


I am going to show you how I did the lilac one using heavy cardstock because heavier two-sided cardstock is the easiest to manipulate. The other two I used lightweight cardstock - I like them better but the paper tears easily when dampened. My flowers are 3 inches in diameter but you can make them any size!


Step 1: You need to gather 3 large punched/cut flowers, 1 medium and 5 small. It really doesn't matter what punch or die cut you use as long as there is a bit of separation between the petals. You also need a pen or pencil, tweezers, plain water mister and I forgot to put adhesive in the image - but that's a given right?

Step 2: VERY lightly mist the large and medium flowers, then using your tweezers gently twist and push the petals towards the center. Be careful not to overly wet them or they will rip. Right before you take the tweezers out give it a gently pinch to keep in place.

Step 3: Set aside to dry.

Step 4: Lightly mist the 5 small flowers. Then using your pen end, cup them around and roll then against the pen to get a good cup shape formed. On one of them pinch it to create your flower center.

Step 5: Glue the 4 flower cups into each other and press with pen end. Remember to off-set your petals. Then glue your center in. Set aside to dry. NOTE: This makes a pretty little rose on its own... just add leaves or a green star-like punched flower underneath to simulate a baby Prima rose.

Step 6: Lightly unravel your 3 large and the medium flower and glue them into each other, the medium one on top. Remember to off-set the petals again.

Step 7: Lightly push back the petals of the mini rose and glue it into the middle of the larger flowers. You can add leaves, or attach to a paper vine/flourish. You can also create "leaves" by putting a green pointed petal flower underneath. I just inked white cardstock.

Then you're done! I love the elegance of these flowers. You can also Glimmer Mist, add Stickles or simply ink the edges as I have done. I over inked the centre to show you the definition but I like them better more lightly inked in the center to look more natural.

I really enjoyed creating these. NOTE: I actually used the pointed flower base to create the pink one below. Like I said use whatever punch or die cut you have because once twisted they all look nice. Have fun and don't forget to show me your results! All I ask is that when possible you please give credit where due (to ANY artist) because tutorials do take a lot of effort to produce. Thank you.

Tuesday, June 29, 2010

No sew lace flower

I love lace, I love scrapbook flowers and I hate sewing. So here is a no sew lace flower tutorial. I can't take full credit because I did see something similar on a blog long ago (can't remember where) but I made mine a little fuller than hers.

You'll need a cardstock circle (rough cut mine about 2 inches), 18 inches or so of THIN lace (or sheer ribbon) or more if your circle is bigger... and a strong fast drying glue that dries clear. This will not work with thick/dense material. Also, the cheaper and rough (not soft and flat) thin lace works better (YEAH!).


STEP 1: Put glue on outer edge of circle. UPDATE: Or use a Cosmo Cricket Gluber (so much easier)
STEP 2: Pleat and fan (like a deck of cards) the first two folds and be sure to turn the starting edge under for a nice finish. Continue pleating and fanning around the circle and add a dab of glue in every pleat.
STEP 4: Put a big glob of glue in the middle and work your fold towards the center.
Step 5: Turn edge under and decorate middle with pearls, beads, a brad etc.
SPEP 6: Once dry, fluff lace.
That's it!


Friday, June 25, 2010

July Scrap That! Reveal

It's the 26th so REVEAL DAY. This month's Scrap That! kit was sooooo elegant that I had a hard time with the thought of chopping up the beautiful Creative Imaginations IOD papers - so I decided not to. I created 4 layouts this month and I've gotta tell you how much value there is in these kits because I still have enough product left over to do another layout.

My first page "big date" is of my parents when they just started dating. The picture was taken in a nightclub with the old fashioned flash Polariod so the picture now is quite faded and damaged - I decided to work with that rugged look and heavily ink and distress this page. I used walnut ink (left over from the May kit) and gold glimmer mist on the originally teal butterflies. And there was even a Making Memories distressing tool in the kit this month too!


Design tip: Distress a damaged photo to make it look like it was supposed to be like that.

For my second layout "moments", I used the beautiful die-cut paper, left over burlap from June's kit and the brown Stickles that were included this month. I just love this picture of my hubby and daughter. There were great chunky brown letter in this kit too!

Design tip: Use online flower tutorials to make your own blooms. Check-out the Scrap That! blog for this tutorial: http://scrapthatchat.blogspot.com/2010/05/hi-everyone-this-is-darien-i-have.html. I just modified it by using different punches.

For my third layout "the sort of love", this is me on my wedding day. I wanted to keep this one simple and elegant. I used my title stamp to create the soft script pattern on the hand cut die-cut shape (was a chipboard frame in the kit). The grey paper and bling were from my stash on this one.

Design tip: Use a crochet doily as a photo mat to add texture to your layout.

And for my final layout this month "angel", I decided to step outside my comfort zone and try something new... water distressing. This picture of my daughter was priceless but was taken at a weird angle in the tub so... I decided to reveal the good parts and do a lot of stamping on this one. The funny thing is I'm not much of a stamper (yet!)... I only own two stamp sets but one of them went perfectly with the papers. The flowers were left over from my June kit.

Design tip: Roll back and ink paper edges to create a custom shape frame around your picture.

Well I hope you enjoyed the layouts and techniques this month. Be sure to check out the other design team member projects too (see right side bar of this blog for the list). Oh and I'm working on that lace flower tutorial I promised... I hope to post it early next week!

Monday, June 21, 2010

Scrap That July Kit Sneak Peek

Only a few more days until the July kit reveal (June 26th)! Here is a little sneak peek from the design team to tease you. I think this this one is my fave since the launch of the kit club in May.


Monday, June 14, 2010

Scrap That! Blog Hop Winners

Congratulations Janelle Bennett you are the SCRAP THAT! blog hop winner for my blog! Please e-mail your full mail address to friends@scrapthat.ca to receive your Sassafras Lass Crafting Kit. A big thanks you to all that joined in the fun and all the winners can be viewed on the Scrap That! forum at http://scrapthat.ning.com/forum/topics/blog-hop-winners. Congrats to all the winners!

Thursday, June 10, 2010

Scrap That! Welcome Summer Blog Hop

I'm so glad that you were able to join us today! Are you excited about all the fabulous prizes including a Cricut??? If you have arrived from the Scrap That! blog you are in the right place, if not then head back there to start.

Today I'm sharing a layout that I created of my son at 2 years (I know he looks like a girl, LOL) for a scrap class I am teaching, using 7 Gypsies papers, lace and Prima bling. I also used a Beggahuna sketch and Darien's flower tutorial on the Scrap That! blog. For the flowers I just used a five and a four petal punch (McGill and Martha Stewart) that I had and they turned out nicely. Plus I made the lace flower. Stay tuned for a tutorial on that one (NO SEWING required!).


Design Tip: Use beads to create a beautiful flower center (or steal them from another flower like Prima).

Before you hop along to Janis' blog (http://thereluctantscrapper.blogspot.com/) you will need my secret word for the blog hop sentence, which is... SCRAP. Remember to leave a comment here with your e-mail before you hop off my blog and you must BECOME A FOLLOWER TO ALL 8 BLOGS TO BE ELIGIBLE FOR PRIZES. Thanks for stopping by and good luck at winning one of the many awesome prizes! See my last post for more blog hop details too -- don't miss out on great prizes so read the blogs carefully!

Scrap That! Blog Hop June 11 and 12

Starting tomorrow there will be a huge Scrap That! summer blog hop with 8 blogs to visit and AMAZING prizes including a Cricut! Here are the contest details:

First you will need to become a follower of each of the 8 blogs (including mine) and grab our logo and post it on your blog. Next, leave a comment including your e-mail address on ALL the 8 participating blogs because in addition to the Scrap That! grand prizes, each blog will have a random draw for a paper crafting kit from Sassafras Lass.

You will then need to swing by the Scrap That! Facebook page and become a friend and become a member of our social community.

So, while you are blog hopping, you will want to look for the "SPECIAL" word on each blog and once you have all 8, create a sentence and e-mail it to info@scrapthat.ca to be entered to win the GRAND PRIZE - a Cricut!

Now, watch for the details on one of the blogs about playing Scrap That! Spot This! for a chance to win one of the June sampler kits which contains over $33 in product... PLUS information on our store hide'n seek game - "Hound Hunt" for another prize!

Is your head swimming with all these contests and prizes? It's gonna be GREAT!!!

Wednesday, May 26, 2010

June Scrap That! Design Reveal

June's Scrap That! kit is full of classy goodies and features the Pink Pailsee Queen Bee Collection.

My first layout "Savor the Journey" was made using the BG paper and Creative Imaginations transparency that coordinated with the kit. As soon as I saw the papers I knew this is what I wanted to do with them... a simple but elegant design. I just love this picture of my boys and my 7 months pregnant belly with my girl. Everything used on this layout was in the kit.


Design Tip: Use strings of gems to frame and bring attention to pictures.

For my second layout "calm"I did a whole lot of distressing and love the effect. I used the left-over dragonfly from the May kit and found the flowers at a local shop. The pic is me relaxing on a houseboat trip. All the papers, alphas and tag are in the June kit.


Design tip: cut out and distress frames to add special interest to pages.

The last layout "Venice" that I have made so far with the kit (I have much more product left) is of my husband on our European trip right before having kids (actually I was 3 months pregnant). I loved the masculine embellies in this kit. Everything on this layout is in the kit including the bonus sketch by Heather Robertson that was used as inspiration.


Design tip: use chalk ink to tint white lace to match your layout.

Well, I hope you enjoyed these layouts and as I said... since I only made 3 layouts, I have tons of left over product to use up.

Monday, May 17, 2010

Easier 9 Petal Flower Variation

Here is a variation of the folded flower from my last post (right side). I was bored watching the kids ride their bikes so I grabbed the leftover paper from my tutorial and made up my own variation. Finally something I can take credit for, LOL - and this one is actually easier!

Step 1: Punch out 9 circles and fold them in half with the petal pattern on the outside this time.
Step 3: Fold back top edge of the circle to create the double bloom. Again make sure all your semi-circles are facing the same way when doing this.
Step 4: Ink the edges and glue the petals as in the previous flower, the bottom to the back of another petal until all are added. That's it!
Note: These flowers also work with ovals, you just need a few more petals and it has a "spikier look".