With simply paper and creativity anyone can create art


Friday, July 1, 2011

85 Dusty Attic listings!

HAPPY CANADA DAY EVERYONE!

Well, after a month of not being able to ship, I was finally able to re-open my shop (http://www.etsy.com/shop/vickyalberto) for Dusty Attic chipboard orders... with a whopping 85 listings! Thank you so much everyone for your patience during our frustrating postal strike. I am so VERY happy it is over.

Anyone who has a pending custom order - I will be contacting you via e-mail shortly.

Monday, June 27, 2011

Wild Roses Tutorial

I have been wanting to do this flower for a while but needed the right technique. Then, I saw some gorgeous flowers made by Charlotte Ravn and she was so sweet and shared how she got the precise wrinkled look to her flowers. This, combined with some modifications ended up looking like the wild roses I was trying to achieve.

Here is what you will need: 3 large, 2 medium and one small flower (I used my retro flower punches but any similar die or punch will do). Ink for the edges, water to mist, glue, a few thin items like paintbrush and skewer, plus a foam mat.

Step 1: Heavily mist the flowers (I had lightly inked the tips first) and curl around a smooth item, then while holding the petal around the paintbrush, GENTLY pinch each petal to wrinkle. This will not work if it is not wet enough. This was the awesome technique tip from Charlotte - curl, hold and pinch - genius! Then, let dry a little. You won't be able to do this with the smallest flower so just smash up the petals a little with your fingers.

Step 2: When almost dry, press into a foam mat to lift the petals. If still too wet, the paper will rip. Let completely dry.

Step 3: Glue all your layers from largest to smallest, while off-setting the petals. The skewer comes in handy to push the small flower into the middle. TIP: Once the glue dries, I like to slightly pinch a few petal ends and re-ink a few tips to give a more realistic look.

Here is a picture of Charlotte's gardenia style flowers that I used for inspiration. I suspect she used 2 large, 2 medium and 2 small flowers and moulded the ends while they were wet to get this look. I left mine to dry curled.

Thanks for stopping by today, let me know what you think!

Thursday, June 23, 2011

2 hearts layout

I couldn't resist the Glitz Design Sketch Challenge this month. I dug up my very last papers of my favorite "love nest" collection (from the Feb Scrap That! kit). At the same time, Dusty Attic is having a challenge on making a layout in Gabrielle's style (one of their DT members). This layout, about my hubby and I the day before our wedding, is the result of combining these two challenges.


I distressed inked the doily and the chipboard then added gold Stickles to the Dusty Attic pieces. I also chalk inked cream lace to better match the layout.

Here is the gorgeous sketch if you want to give it a try. I flipped the sketch to better suit my layout.

Doing two challenges on one layout was not an easy task and took me a very long time to scrap. I'm happy with the result though.

Sunday, June 19, 2011

Creative Scrappers #161 & Pion Design

Today is the last post for my Creative Scrappers term. I am exploring some great opportunities in the upcoming months so stay tuned. This week's sketch #161, by Kristine Davidson, was a fun challenge and I stared at it for a long time before touching any paper (but I think this is my fave of all the CS layouts I have done).

This is a picture of my husband and I on our wedding day. I challenged myself to do a mostly white layout. I've seen some really gorgeous white plus one color layouts lately so I thought I would give it a go. The paper is from the Pion Design "studio of memories" collection. I took inspiration from the white railing in the picture and painted a Dusty Attic swirly chipboard frame in white crackle paint. I also got some use out of my Martha Stewart punch by double layering the butterflies with a lavender shadow behind the white.


Here is a close-up of the frame and the flower I made (then added a rosette as the center).

Here is the great sketch I used this week...

Thanks for stopping by today!

Saturday, June 11, 2011

Handmade Pearl Flourishes

I had shared this technique on Ideas for Scrapbookers a while back but thought I would archive it here too. Here is a quick trick... use any flourish stamp and a watermark ink pad as a guide to follow along with pearl paint for an easy handmade bling flourish. Ranger liquid pearls or good quality fabric paint will work (the cheap stuff may bleed a little - test on a scrap first). I use the Inkadinkado Dot Flourishes set because the lines are thin and the watermark image is no wider than an adhesive strip on bought flourishes. You can GENTLY tap the back of the paper to flatten the paint dots if you want more rounded "pearls" without peaks. So fast and easy!


Thursday, June 9, 2011

One sheet of paper card w/instructions

I did this fun little project for an Ideas for Scrapbookers post about "What can you make with only one sheet of paper?".


Sometimes we only have one sheet of paper left over from a collection or we need a quick card for a last-minute gift. Here is an idea... a pre-loaded gift card holder.

This cute little self-standing purse card was made using only ONE sheet of double-sided Pion Design papers from the "fairytale of Spring" collection... including the handmade flower!


I cut a 12x12 inch sheet to have an 8x12 piece and reserved the left-over 4x12 piece for the card holder and to make the flower. I made my folds, cut the top curve and glued the gift holder (faux stitching explained below) with a stamped "happy birthday" saying. There is plenty of space below for a personal hand-written message too!

Next I glued a piece of ribbon to resemble a clutch style purse and added self-adhesive Velcro to keep closed. I also lightly scraped the paper edge with a distressing tool.

 Then, I added faux stitching by paper piercing and connecting the holes with a fine scrapbooking marker. This is a nice alternative when you don't have a sewing machine handy or if you're like me... don't ever sew anything at all!

 Lastly, with the scraps I made a lily flower using my tutorial and the reverse side of the paper (same as inside the card).  Check out all of the flower tutorials in the right sidebar of my blog - any style of flower would look nice. Tip: make your flower first and let it dry while you are making the card.

Can you believe this card only took me about half an hour to make from start to finish?

Sunday, June 5, 2011

Creative Scrappers #159 & Pion Design

(For the SCRAP THAT! blog hop, please click link or scroll to next post)

Back for another Creative Scrappers reveal using the wonderful sketch #159 by Nicole Nowosad and gorgeous Pion Design Papers.

My "together" layout was created from the "Studio of Memories" collection. I tried something a little different and left a lot of negative space on this layout for a change. This is a picture of my grandfather when he met his newest great grandson (and his older brother) for the first time. My grandfather's favorite color is blue and he adores birds so this collection is a perfect reflection of him. He has fed hundreds of thousands of birds with his numerous feeders and bird houses in his yard over his lifetime.


Here is a close-up of a butterfly cut-out and the flower style used on my layout. These flowers are actually produced for bridal decor but since they are made of acid-free mulberry paper, they are safe to use for scrapbooking.

Here is the beautiful sketch that I flipped...

I also used TCR palette #50 as inspiration...

 Thanks for taking a look at my work today!

Friday, June 3, 2011

Scrap That! June Kit/Blog Hop

Wow, June is already here and it's time for another kit reveal and blog hop! We have SEVEN AMAZING blogs for you to visit today, each with a some beautiful projects that were created using the Scrap That! June "Afternoon Tea" kit. f you have just arrived here from Robinʼs blog (our amazing guest designer this month!) you are in the correct place. If not, head back to the Scrap That! blog and join us.  All qualifying entries will be entered into a draw for the GRAND PRIZE, a Scrap That! kit.


For my first layout "Friends", I used the gorgeous kit sketch by LG Belarmino. These blue and green Websters papers from the Ladies and Gents collection were my favorite and a perfect background for this picture of my boys goofing around while we were testing our camera. I added a heart doily (distress inked it) and a Dusty Attic title chippie from my stash but everything else is from the kit... including the chipboard clock and matching green background cardstock!

Design Tip: Cut-off stamens on a large flower and layer a smaller one in the middle instead for a pretty focal flower.


For my "so sweet" layout, I fussy cut the main paper and layered on some doilies from my stash to make the pink circle pop against the texture. These were perfect papers for this candid chubby baby shot of my daughter in her stroller (two years ago).

Design Tip:  Use the kit technique product which is white FlowerSoft this month, to give cool texture to the paper flowers in the kit.


My last layout with the kit, "my hunny bunny" is my daughter as an infant. I can't resist to add pink to layouts about her. I made four large flowers using the plain white cardstock in the kit and various techniques from my my flower tutorials (quick link found in the right sidebar of this blog). Everything you see on this page is from the main kit - NO add-on embellies or stash items used at all!

Design Tip: Add flowers to floral paper for a gorgeous full garden effect.


REMEMBER: To qualify for the Grand Prize of a Fully Loaded Scrap That! Paper Crafting Kit you must...
1) VISIT ALL SEVEN BLOGS ON THE HOP, LEAVE A COMMENT AND BECOME A FOLLOWER OF EACH BOG
2) GO TO SCRAP THAT! FACEBOOK PAGE AND BECOME A FRIEND
3) GO TO THE SCRAP THAT! NING COMMUNITY AND BECOME A MEMBER

We hope you all had good fun hopping with us today, thank you so much for playing along!
The hop ends on Sunday, June 5th at midnight MST.
Watch for the Scrap That! newsletter on June 22nd to see if you are one of the lucky winners!


In case you got lost on the way...
Scrap That! - http://www.scrapthatchat.blogspot.com
Ivana - http://papergirlcrafts.blogspot.com

Janis - http://thereluctantscrapper.blogspot.com
Karen - http://agirlsscrapobsession.blogspot.com
LG - http://scrappinworld.blogspot.com
Lisa - http://kaye2222.blogspot.com
Robin - http://robinshakoor.blogspot.com
Vicky - http://simplypaperandcreativity.blogspot.com

Wednesday, June 1, 2011

Pion Design Frame

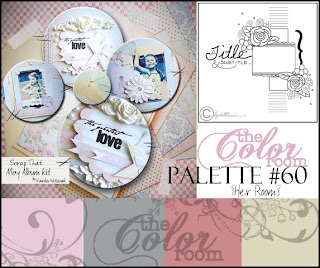
My cousin is having a baby girl this Fall so I wanted to make a little pink frame to match her room. Then, I saw The Color Room palette #60 and knew I had my inspiration.

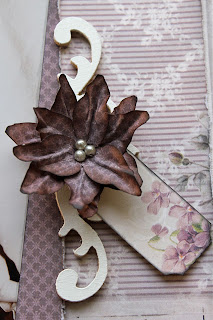
The wooden frame is covered with a Pion Design pink paper from the "Fairytale of Spring"collection as well as the large handmade flower. I also used various other Pion Design collections for the vintage image, background paper and butterflies. I just love how all the collections blend well together.

Here is a close-up of the embellies and the handmade flower (see my flower tutorial).

This is the palette I used, which just happens to be sponsored by Scrap That! this month.

Thanks for taking a peek!

Tuesday, May 31, 2011

Scrap That! June Sneaks

The June Scrap That! kit reveal will be on Friday, June 3rd, along with a 3-day blog hop -- starting at 10 am MST on Friday and ending at midnight MST on Sunday. Here is a little tease from the design team...


Monday, May 30, 2011

My Etsy Shop Status

Last week I had to put the shop on vacation mode due to my daughter's eye surgery and now there is a potential postal strike threat this week. So, the shop is on hold for now ("vacation mode"). I don't want to risk any parcels getting hung-up in nowhere land!

I'll still be placing a Dusty Attic chipboard order next week since it takes them a while to cut it... so I should have more of the new styles (from the April release) at the end of June (or beginning of July depending if the postal workers settle quickly). For any custom orders, I just need the product name and code from the DA site http://www.dustyattic.com.au e-mailed directly to vickya@shaw.ca.

Thanks again for making my new business a success! Now... I just need Canada post to cooperate!


Sunday, May 22, 2011

Creative Scrappers #157 & Pion Design

Design team reveal day for the Creative Scrappers sketch #157 by Aphra Bolyer. I knew right away I was going to love this layout. The sketch is so fantastic. I used some more fabulous Pion Design papers for this one in a color I rarely scrap - purple! This is such a gorgeous plum that it was easy to scrap to my taste though (I really struggle with lilac tones).

I had these pregnancy photos taken with both of my sons that were supposed to be sepia but turned out halfway between black & white and sepia. The purple tones in the Pion Design papers (Studio of Memories collection) were perfect to complement this printing mistake. I have a very strong bond with my kids and they do with each other too. This is a very special memory to preserve... waiting for their baby sister! I now regret not taking photos like this of my other pregnancies (hubby took the pictures too!). I was almost 8 months pregnant here...


I created some flowers using my recent Lily Flower Tutorial. Instead of white paint and chalk, I used brown inks on the edges since the paper was so dark I and didn't want to cover up the pattern on it.


Here is the gorgeous sketch that I flipped sideways and upside down.


Thanks for stopping by to take a look and please be sure to check out the rest of the Creative Scrappers DT's interpretation of this beautiful sketch.

Wednesday, May 18, 2011

Scrap-lifted!

I had to share this layout created by Jenny (owner of Pion Design) because I was so honoured that she scrap-lifted my "delicate" layout (below). This was one of the layouts I had submitted in my DT application to her. I just love the little paper booties she made (gotta learn how to make those now) and how she took my design concept and used the Pion Design "fairytale of spring" collection. Her layout has such a wonderful vintage look and that picture is priceless!

Jenny's take on my layout...

Here is my original...

I just found out that Pion Design has released 6 new papers too as an "encore" to coordinate with the 2 latest collections (see them here http://shop.textalk.se/se/shopwindow.php?id=12164&shopwindow=1596664). Stay tuned for more projects!

Tuesday, May 10, 2011

Lily Flower Tutorial

A new flower tutorial for you today! I am in love with the new Prima Corine flowers... but of course they are hard to find here in Canada and I just needed to see if I could make my own version (for a fraction of the price and with adding an extra petal layer :)  I am using some Pion Design paper scraps to make these from the "Fairytale of Spring" collection to coordinate with upcoming projects.


Here is what you will need: 
- 3 flower shapes with 3 pointed petals. I just used my Marvy punch and hand-cut the petal corners off. I must say this is my favorite flower punch because of the versatility and embossed feature. You can just cut out a similar shape and trace it if you don't have similar punch or 3-petal die cut.
- Water to mist
- Scrapbook chalk or chalk ink (I prefer scrapbook chalk for this and actually found some at my dollar store!)
- White paint or snow writer, puff paint or glitter - whatever best suits your project style
- A decorative brad or a few pearls or stamens for the center
- A rounded object (like a Sharpie pen or painbrush end)
- A foam mat (like a computer mouse pad)
- Glue of choice


Step 1: Make your template.

Step 2: Cut your 3 flower layers.

Step 3: Water mist the layers and pinch the towards the middle of each petal to create a crease.

Step 4: While still damp press the center into the foam mat to raise the petals. Let dry completely before the next step.

Step 5: Add some chalk or ink to the center and over the crease for definition.

Step 6: Glue your layers and press all together into the mat to form a little space for the centre pearls to fit into.

Step 7: Paint or...
glitter your tips

Step 8: Glue your decorative center and you are ready to add to your project!

Let me know what you think!